Corrugated sheet installation guide
Working with corrugated sheet is not rocket science - in fact, its simplicity is one of its biggest advantages. But both with corrugated roofs and with fences there are a few basic rules you must follow, otherwise the result will not last - and that is exactly when people tend to blame the manufacturer or the material itself. We wrote this guide so you can avoid the mistakes we keep running into year after year. The material is good. Most of the problems happen during installation.

Work out your material requirement in under a minute!
Free, no obligation - no personal details required
Planning and preparation
The success of the installation is often decided already during preparation. If you get something wrong at this stage, it can easily ripple through the entire job.
Check the roof structure
Before putting up a single sheet, there are three things you need to measure:
- Is the structure square? Measure the diagonals from corner to corner both ways. If they do not match, the structure is not square, and that will cause problems during installation.
- Is the surface flat? Pull a string line along the top of the purlins. If it domes or dips anywhere, the sheet will not sit flat.
- Eaves line: the eaves should be straight and at right angles to the purlins. If you start off crooked, after 20 sheets you will have a centimetre-scale error.
Use the Pythagorean theorem, or the 3-4-5 triangle method. Mark out 3 metres in one direction, 4 metres in the other - the diagonal has to be exactly 5 metres. If not, something is off square.
Purlin spacing
Purlin spacing decides whether the sheet can carry the load - snow, wind, its own weight. If the spacing is too big, the sheet sags, bends under snow, and from there there is no way back.
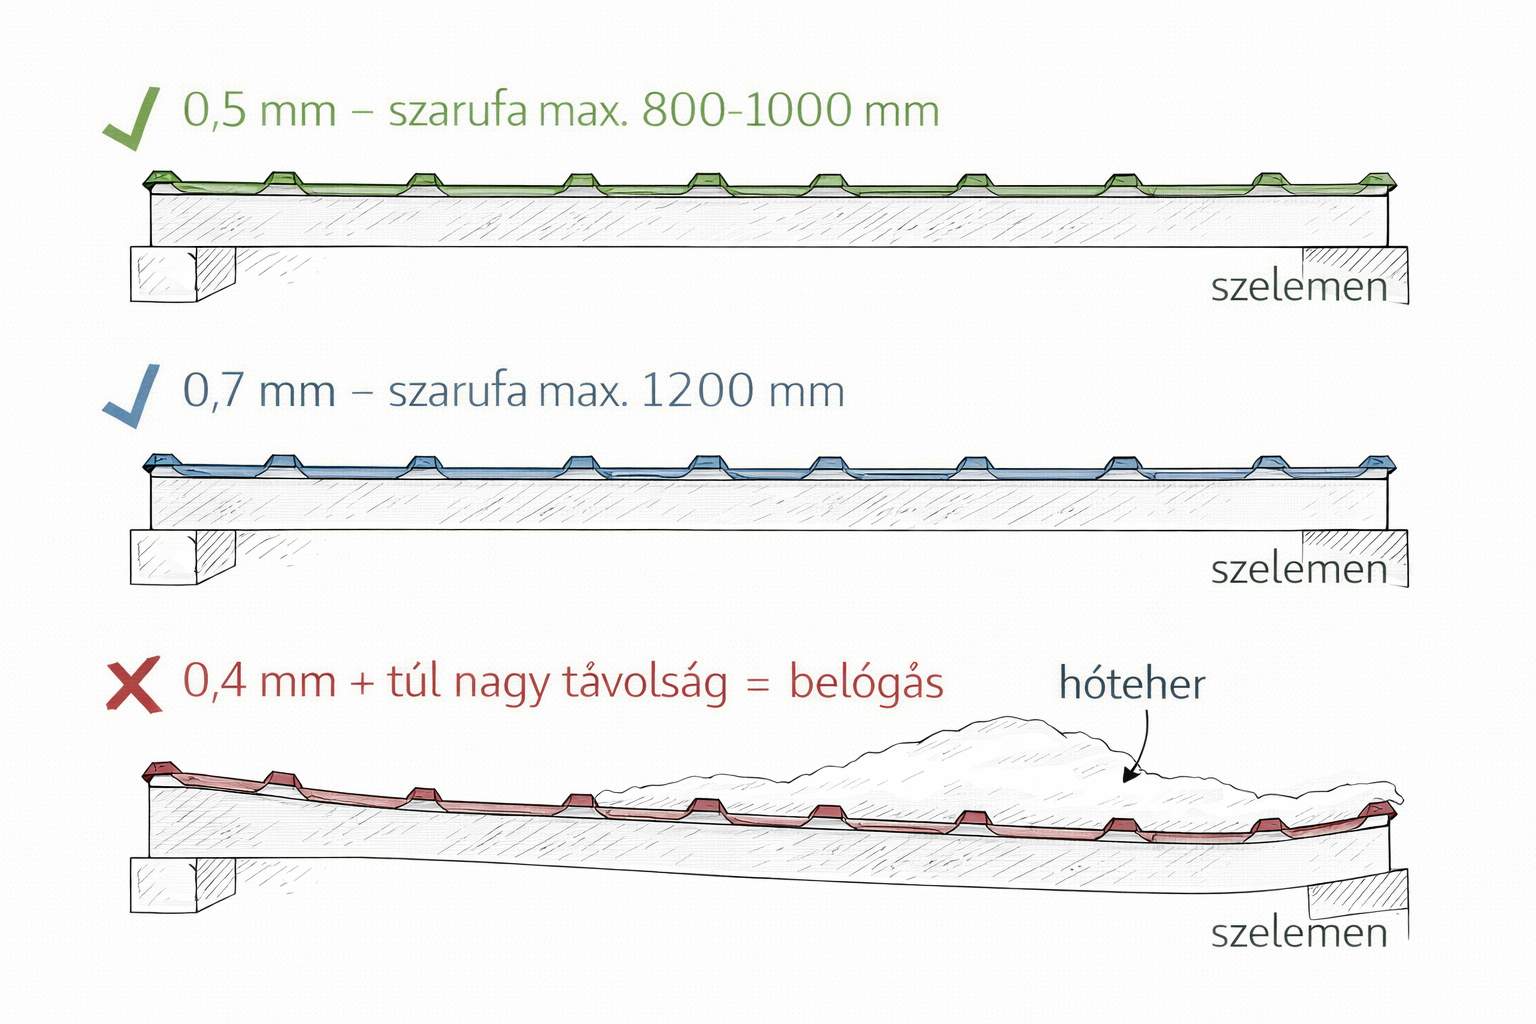
| Profile | Recommended max. purlin spacing |
|---|---|
| T18 (0.5 mm) | 80-100 cm |
| T18 (0.7 mm) | 100-120 cm |
| T35 | 120-150 cm |
| T40 | 150-200 cm |
| T45-T50 | 200-250 cm |
The reverse is also true: if you do not want to buy a thicker, more expensive sheet, you can get the same result with closer purlin spacing. The detailed support calculations are in our separate guide.
Purlin calculator
Enter the sheet type and the conditions - we will calculate the recommended purlin spacing.
How does the calculator work?
The calculation is based on the exact data from the article table. Every profile-thickness pair has a base purlin spacing.
Snow zone: In Zone I the full distance. In Zone II −10%. In Zone III −20%.
Roof pitch: Low pitch −15%. Steep pitch +10%.
Solar: −20% because of the extra load.
The recommended spacing is 90% of the maximum - that is the safety margin.
The calculator is for guidance only. The calculated values are for average Hungarian conditions (Zone II snow, normal wind load). In special cases (mountains, open terrain, solar panels, pitch below 10°) structural sizing is required. The contractor is always responsible for the final decision.
Minimum roof pitch
A big advantage of corrugated sheet is that it works at a lower pitch than tile (which needs at least 22 degrees). But there is a limit here too:
| Profile | Minimum pitch |
|---|---|
| T8-T20 | min. 6° (≈10%) |
| T35 and above | min. 4° (≈7%) |
Watch out on flat roofs: below 14 degrees the longitudinal overlap has to be increased to 200 mm with butyl sealing tape between the sheets. The flatter the roof, the more slowly water runs off - and the higher the chance it gets drawn back at the overlap. The 15-25 degree range is where you have the fewest problems: steep enough for water to run off, but not so steep that installation becomes hard.
Cutting - the most common mistake
If you only remember one thing from this entire guide, let it be this: never cut corrugated sheet with an angle grinder.
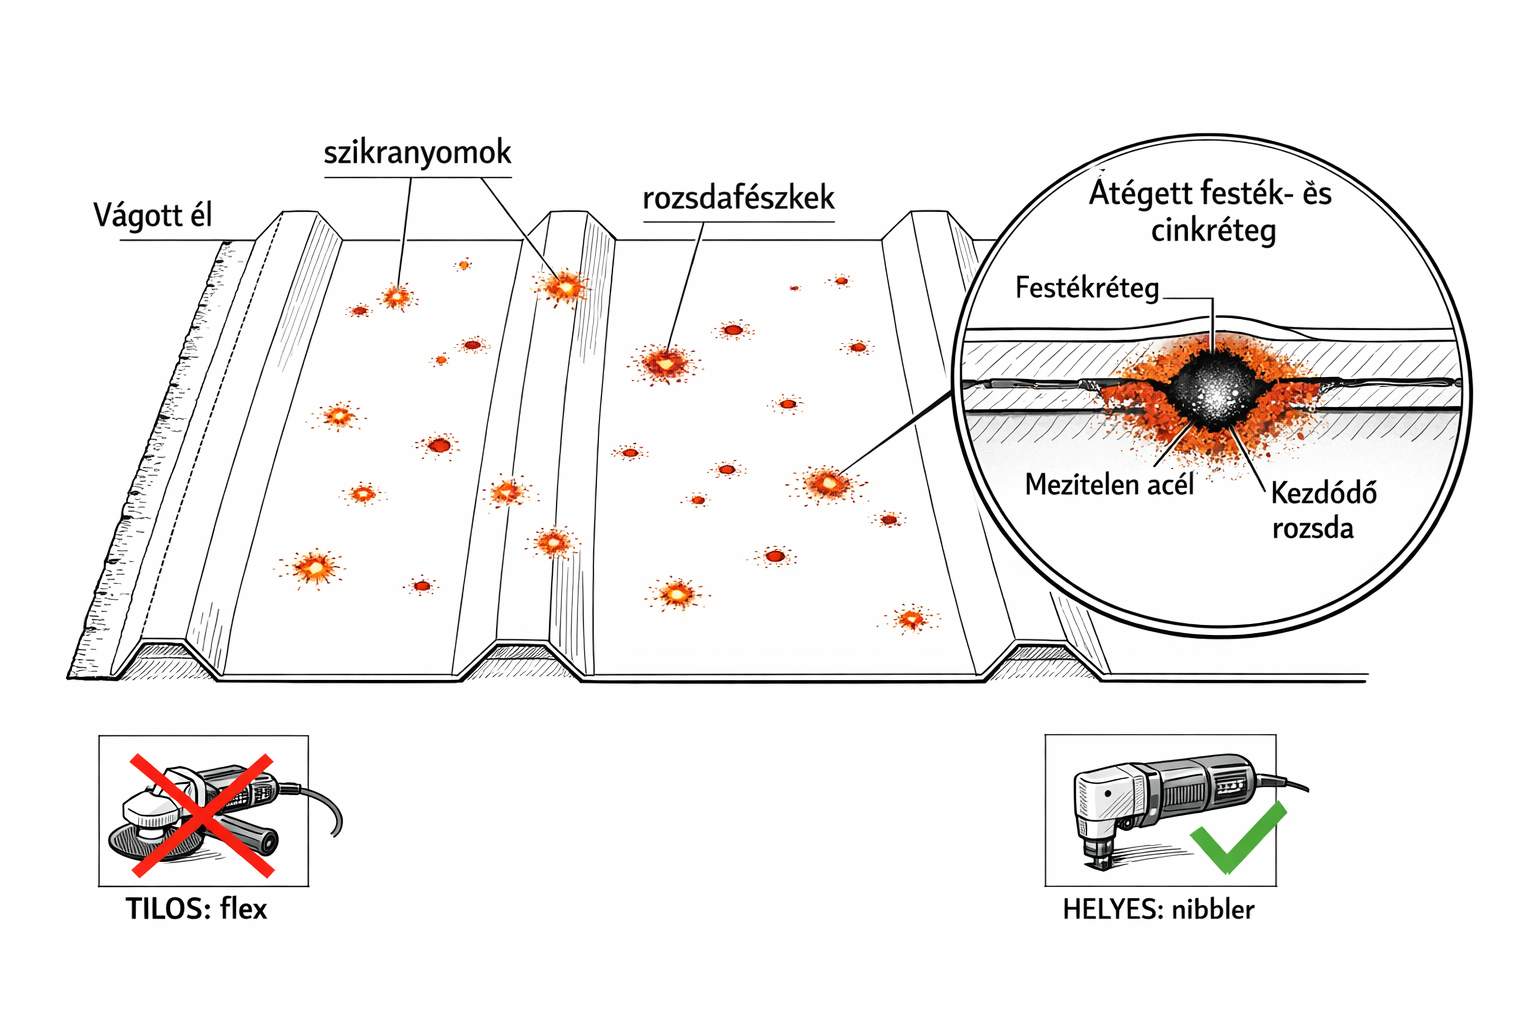
The red-hot metal sparks from an angle grinder burn into the paint and zinc coating, so it does not just break the galvanising at the cut line, but everywhere a spark landed - across the whole sheet. Within six months to a year rust spots appear at every burn mark, and manufacturers void the warranty without exception.
We have seen roofs where after a single day of grinding, the whole surface was covered in tiny rust spots. The customer thought it was a manufacturing fault. It was not.
What you can use
| Tool | What it's good for |
|---|---|
| Nibbler | The best solution - clean cut, no heat generated |
| Electric sheet metal shears | Excellent for both straight and curved cuts |
| Hand-held tin snips | For short cuts and small adjustments |
| Circular saw with metal-cutting blade | Only at low rpm, coated side facing up |
But the easiest solution: we cut the sheet to size for free if you buy it from us. That way the cut is guaranteed to be professional, and you do not need to fuss with it.
If you still want to cut it yourself, pay attention to two things: the cut edge always goes on top (on the covered side), and immediately after every cut sweep off the metal swarf with a soft brush. (The swarf rusts within days and leaves permanent spots on the sheet.) Then paint the cut edges with touch-up paint or zinc spray.
Storage - staining
One of the most common complaints: the customer has the sheet delivered in autumn, puts it in the garden, covers it with a tarpaulin, and by spring finds white spots on it. That is white rust (zinc hydroxide) - and manufacturers exclude complaints about it from the warranty without exception.
Zinc hydroxide forms when trapped moisture on a galvanised surface reacts with the zinc layer in a low-oxygen environment, producing a white, powdery deposit. The reason this is a problem: the process blisters and gradually breaks down the protective zinc layer - meaning it destroys the very coating that protects the sheet from red rust.
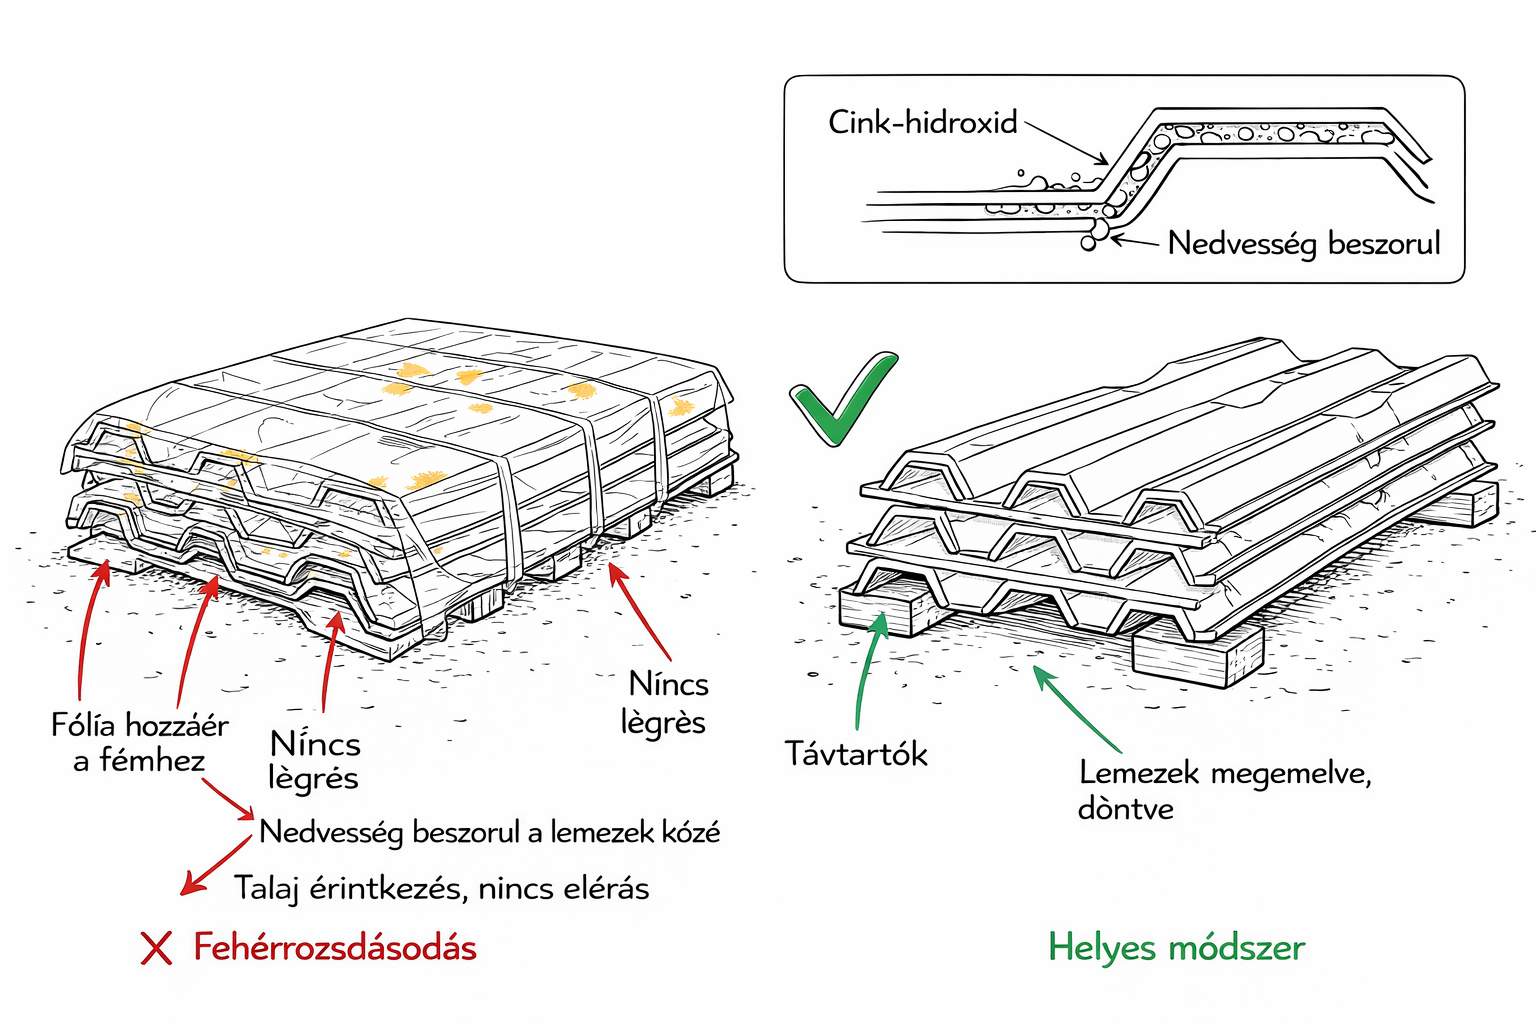
- At least 20 cm off the ground, on boards or a pallet, separated from the soil
- Tilt it by at least 3-4 degrees so water runs off
- For storage longer than two weeks, put dry timber battens between the sheets
- Never cover it airtight - if you cover it, leave ventilation underneath
- Remove the protective film within 3 months
Never drag the sheets across each other, because you can scratch the coating. Always lift the sheets and secure them against the wind as well, so no storm can damage them during storage before they get into place.
The order of installation
Always work from bottom to top, moving from the eaves line towards the ridge. Sideways, start against the prevailing wind direction - if the wind typically comes from the west where you are, start from the eastern gable. The reason is that this way the windward side of the overlaps always stays covered, and the wind cannot push water under the joints.
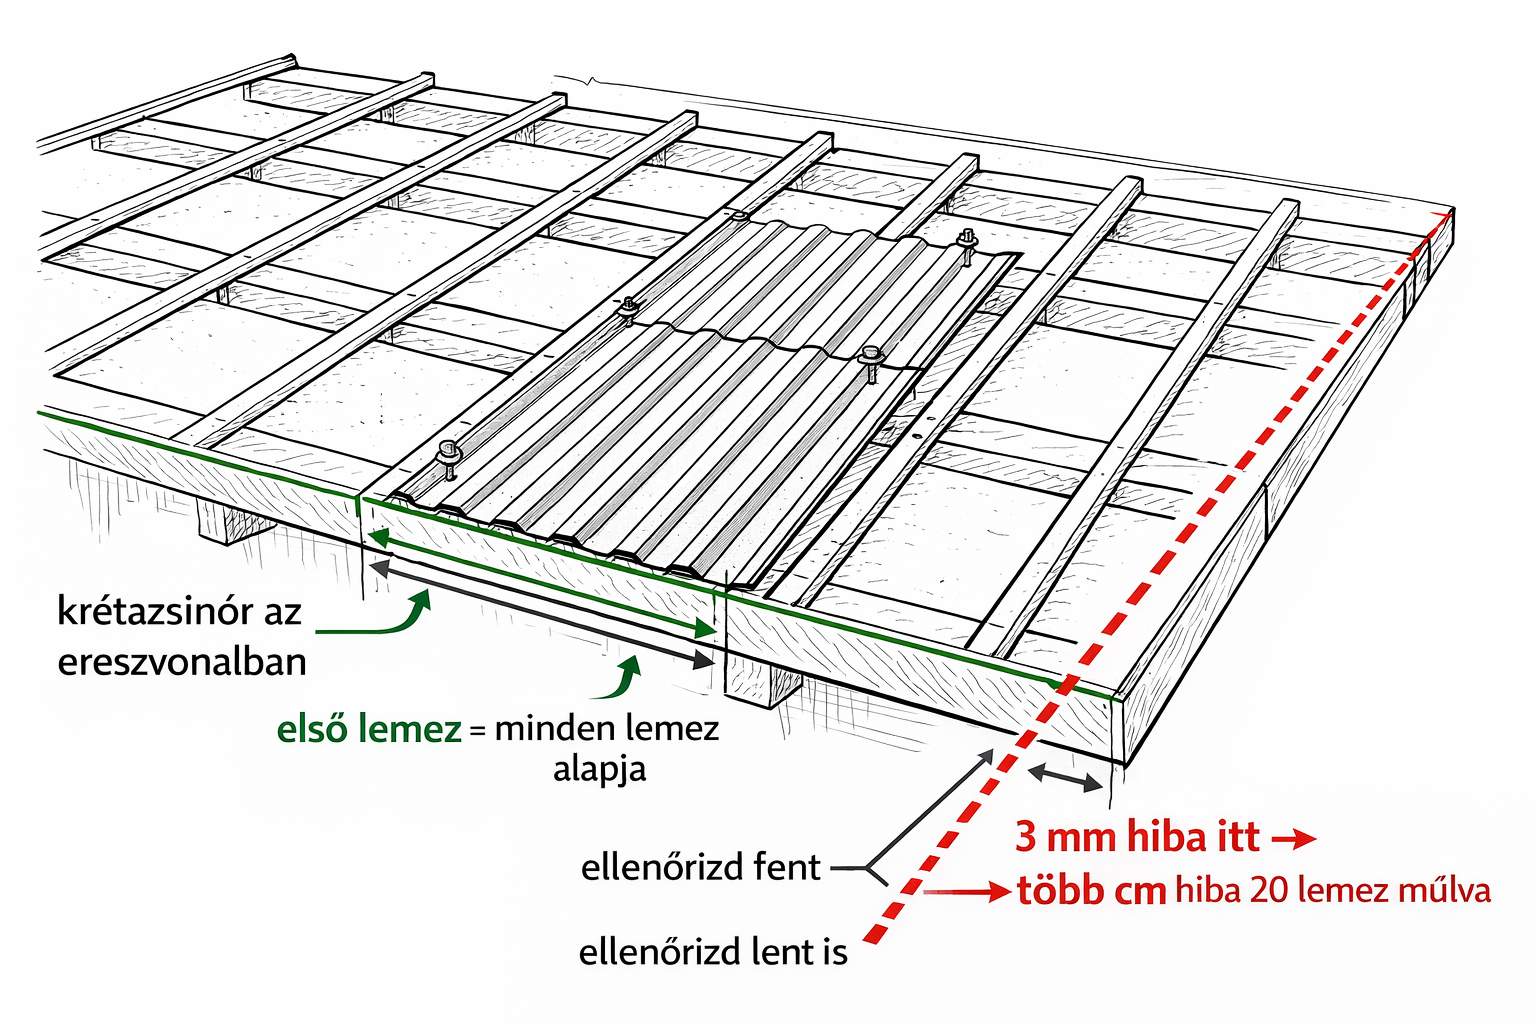
The first sheet decides everything
The position of the first sheet determines where all the others go. If you place it 2-3 millimetres off, after 20 sheets the deviation is already several centimetres, and on top of that the error is visible from the ground too.
Pull a chalk line along the eaves line and measure the distance from the gable at both ends of the eaves. If the two values do not match, the building is not square - which is not rare at all. In that case, spread the deviation evenly between the two gables, do not pile it all up on one side. Every 3-4 sheets, check with a square that the sheets are perpendicular to the eaves line - if the row starts to drift, you can still correct it in time.
The accessories and the order of fitting them
The order of installation is crucial because several flashing elements go underneath the sheets - if you skip these and try to fit them later, you have to strip sheets off again. Work in the following order:
First lay down the roofing membrane (if the particular roof structure needs one), then the battens and counter-battens. These form the base that everything else builds on.
Before the sheets go on, three flashing elements need to be in place. Fit the drip edge (eaves flashing) on the edge of the eaves first - it drains the water from the bottom of the sheet into the gutter, and the corrugated sheets overlap it. If there is a valley on the roof, the valley flashing also goes on now, because the sheets overlap it from both sides. Finally, fit the lower wall flashing where the roof meets a wall - its upper leg goes under the wall, its lower leg under the future sheets.
Now come the corrugated sheets themselves. Only start once the three elements above are in place.
After the sheets are up, the flashings that go on top of the sheets follow. Fit the gable flashing to the two sides of the roof - this covers the cut edge of the sheets at the gable and protects against wind blowing in underneath. Fit the upper wall flashing where the top edge of the roof meets a wall - this overlaps the sheets and is chased into the wall. Fit the ridge piece on top of the roof.
As the last step, fit the snow guards, paint all the cut edges with touch-up paint, and sweep the metal swarf off the entire surface - if it stays on, it leaves rust spots within days.
Weather conditions
Do not start installation in strong wind (above 32 km/h), rain or on a frozen surface. A wet sheet is slippery, a frozen purlin does not hold properly, and the sealing materials - butyl tape, silicone - need at least 4 °C, below that they do not bond properly.
Even more important: never carry a sheet up onto the roof in the wind. A one-metre-wide, six-to-eight-metre corrugated sheet effectively behaves like a sail - even a weaker gust can wrench it out of your hands, or worse, blow the worker holding it off the roof. This is one of the most serious accident risks during installation.
Screwing - the most critical step
The vast majority of roof leaks are not caused by the sheet, but by incorrect screwing. If you overtighten, the rubber washer flattens and starts to crack. If you leave it too loose, it does not seal and the wind loosens it. If you screw in the wrong place, the sheet does not sit properly on the support structure. All three lead to leaks - often not straight away, but months later.
Where should I screw?
The screwing point depends on whether you are doing a roof, wall or fence - and on a roof, on the profile too. There are two methods and it matters that you pick the right one:
Valley fixing (Tiefsicke)
The screw goes into the valley, where the sheet rests directly on the purlin. Solid support, shorter screw, simple to execute. For the residential T18 profile this is the established Hungarian practice.
T18 roof on timber structure: valley fixing, with a 4.8 × 35 mm timber fixing screw. The T18 profile's rib height is only 18 mm - too low to screw into the top of the rib with a saddle washer, because the screw would effectively go into the purlin and the saddle would not sit properly either. With this profile valley fixing works perfectly: the sheet rests in the valley directly on the timber purlin, the screw gets solid support, and because of the small profile, drainage does not pose as much risk as with a sheet with taller ribs.
T35+ industrial/larger profile: crest fixing with a saddle washer, with a longer screw (min. 40-50 mm engagement). With T35 and larger profiles, the rib height is sufficient for the screw to go into the top of the rib together with a saddle. The advantage is that the screw hole is above the water-carrying surface - water runs in the valleys, and if we punch the sheet there, the chance of leaks over time is much higher. Without a saddle the screw pushes the rib down, the sheet dents, and water pools in the dip.
On walls and fences: the screw goes where the sheet rests on the rail - with vertical sheeting that is the underside.
Which screw should I use?
| Screw | Size | Use |
|---|---|---|
| Timber fixing screw | 4.8 × 35 mm | Fixing to timber structure |
| Self-drilling (thin metal) | 4.8 × 19 mm | To thin steel purlin |
| Self-drilling (thick metal) | 5.5 × 25 mm | To thicker steel rail |
Every screw must have an EPDM (vulcanised rubber) sealing washer under the metal washer - this provides the watertight seal.
How many screws do I need?
Count on 10 screws per square metre - so a box of screws (250 pcs) is enough for about 25 m². This is not the same everywhere: in the middle of the roof 6 pcs/m² is enough, at the edges 8, but at the corners you need 10, because that is where wind uplift is strongest. At the eaves, ridge and the rows next to the gable, every valley gets a screw. At the intermediate purlins, every second or third valley is enough. On walls 5-7 pcs/m².
Screw & fixing calculator
Work out how many screws you need, split by zone.
The correct tightening
Use an adjustable-torque screwdriver, avoid the cordless impact driver. Because of its hammering action, the impact driver does not allow fine torque control - it can overdrive the screws, crush the EPDM washers, and you cannot feel when it is enough. Set the torque to 3-5 Nm and practice on scrap pieces before you go on the roof.
The sign of correct tightening: the EPDM washer just bulges past the edge of the metal washer - a tiny bulge is visible, but no more. If the rubber flattens and squeezes out, it is too tight. If you can still turn the screw by hand, it is too loose. Drive every screw perfectly perpendicular - a crooked screw causes uneven washer compression and partial sealing loss.
If you buy a depth-stop attachment - which costs a few thousand forints - it physically prevents overtightening. With this one accessory, 90% of screwing problems can be avoided.
Overlaps and sealing
Wherever two sheets meet, a weak point is created. Most leaks happen not on the surface of the sheet but at the overlaps - so accurate work here is especially important.
Side overlap
The total width of our T18 sheet is 116 cm, of which the effective covering width is 110 cm - the remaining 6 cm is for the overlap with the neighbouring sheet. The overlap always covers at least one full rib. A small groove runs along the edge of the sheet - the anti-capillary groove. This breaks the path of the water so it cannot be drawn up between the two sheets by capillary action. It is important that the overlap direction is correct: the next sheet goes on top of the one underneath on the leeward side. If you do it the other way round, the groove cannot do its job, and water slips into the joint despite gravity.
Longitudinal overlap
If the slope length of the roof is longer than a single sheet, the sheets need to be lapped on top of each other. The upper sheet always comes from the ridge end and laps over the lower one, so the running water cannot get under the joint. The amount of overlap depends on the roof pitch - the flatter the roof, the more overlap is needed, and the more important the sealing is:
| Roof pitch | Minimum overlap |
|---|---|
| > 15° | min. 150 mm |
| 10-15° | min. 200 mm + butyl sealing tape |
| < 10° | min. 300 mm + double row of butyl sealing tape (~100 mm apart) |
| Wall cladding | min. 100 mm |
The joint always has to fall over a purlin - if the two sheet ends are hanging in the air, there is no solid fixing point, and the wind can also lift it open. The best solution, though, is to avoid a longitudinal joint altogether: order the sheet in a single piece, from the eaves to the ridge. We can supply sheets up to eight metres long - so you eliminate this risky joint entirely.
Sealing materials
Three things are needed for sealing, and it matters that you do not mix them up:
- Butyl sealing tape (6×4 mm): The basic one. For overlaps, under flashings, for every hidden seal. Stays sticky forever, flexible in frost and heat alike. Apply it from the roll onto a clean, dry metal surface - and do not stretch it as you apply, because that damages the integrity of the seal.
- Neutral-cure silicone: For outside, where UV hits it: pipe penetrations, around flashings. Important: never use acetic-cure (vinegar-smell) silicone - it eats away the zinc.
The basic principle is simple: wherever metal meets metal on the roof, there has to be either a seal or a washer between them. Sealant is always secondary protection - if a junction is only watertight because of the silicone, it is a bad solution and will fail sooner or later.
Thermal expansion - the cause of mysterious cracking and rippling
A 10-metre galvanised steel corrugated sheet - whether T18 or T35 - at a temperature swing between -10 °C and +40 °C is about 6 millimetres longer in summer than in winter. That does not sound much, but if you rigidly fix the sheet at every point, those few millimetres generate enormous internal stress.
Dark coloured sheets (anthracite, graphite, dark brown) absorb more solar energy - their surface temperature can reach 60-80 °C in summer. Thermal expansion and contraction happens every single day, and this is what causes the "mysterious" roof leaks, the cracking noises and the rippling.
Fixed point + sliding points
The principle of the solution is simple, but it is important to follow: fix the sheet rigidly at one point (typically at the ridge), and at every other point use a fixing that allows the sheet to move. This can be:
- Oval slots: The screw moves freely inside an elongated slot along the length of the sheet. This is typically applied at the factory on T35 and larger industrial-profile sheets.
- Sliding clips: Also used on T35+ profiles; they hold the sheet with a saddle but let it move freely.
On a residential T18 roof with shorter sheets (4-6 metres), thermal expansion rarely causes problems - the movement is small, and the EPDM washer on the screw absorbs some displacement. But with T18 sheets longer than 8 metres it is worth paying attention, especially with dark colours. With T35 and larger profiles, using the fixed-point - sliding-point system is fundamental.
Flashings and junctions
The roof itself is usually not the problem - 90% of leaks are at the junctions. Eaves, ridge, gable, chimney - that is where everything is decided.
Ridge piece
Closes the ridge line of the roof. Standard length: 2000 mm/piece, ~150 mm overlap. Between the ridge piece and the sheet you have to fit a sealing profile (foam closure). Fixing: on every second rib.
Gable flashing (verge)
Covers and protects the side of the roof. Standard height: 5 cm, length: 2000 mm. Fixed with ~50 mm overlap and ~300 mm screw spacing.
Wall flashing
Closes the junction between the wall and the roof. In two layers: the lower goes on before the sheets, the upper goes on after the sheets. Fix the wall flashing to the wall - not to the roof - otherwise thermal expansion will tear it apart.
Drip edge
The first flashing element. Channels water into the gutter. ~50 mm overlap, ~300 mm screw spacing. Should project 6-12 mm past the fascia board.
At penetrations (vent pipe, antenna) an EPDM rubber boot is the simple solution. Chimneys need stepped flashing, with a saddle on the upper side to divert the water.
Vapour control and ventilation
Corrugated sheet is watertight in itself - water does not pass through metal. But water does not only come from above. Condensation attacks from inside, and if it is not managed, it drips back down from the ceiling.
When do you need a membrane?
Simple rule: if the building is heated, you need a membrane and ventilation. The warm indoor air contains moisture, which condenses on the cold sheet, drips onto the timber structure, goes mouldy, rots. For an unheated building (garage, shed, warehouse) a membrane is not needed. Condensation can still form there - the metal roof radiates out at night below the indoor air temperature and moisture condenses on it - but in open or well-ventilated buildings this usually does not cause problems.
Vapour barrier
On the inner (warm) side of the insulation. Overlap: min. 10 cm, airtight-bonded with self-adhesive tape. Every leakage point is a potential source of mould.
Breather membrane
On the outer side of the insulation, under the sheet. Lets moisture through outwards, but prevents rainwater getting in. Overlap: min. 10-15 cm.
Ventilation gap
For insulated structures min. 40 mm. Air enters at the eaves and leaves through the ridge vent. An insulated roof without ventilation will inevitably be damaged.
Anti-condensation felt
There is a fabric layer factory-laminated to the underside of the sheet - anti-condensation felt (the best-known brand: DR!PSTOP) - which absorbs condensing moisture and, when conditions improve, evaporates it back off. It can mainly be useful in unheated, enclosed buildings (e.g. closed warehouse, stable), where ventilation is not enough to carry the moisture away, and dripping is a problem.
The felt does not prevent condensation from forming - it prevents it from dripping down. It can absorb up to 1 litre of water per square metre, it is fire-resistant, and it also dampens rain noise. The felt is factory-bonded to the sheet before profiling - applying it on site afterwards is not a solution. The felt needs ventilation to dry out: without airflow it stays saturated over time and still drips.
Thermal insulation
If there is heated space below the roof, insulation is not optional. The only question is which solution you choose. We cover the cold roof vs. warm roof question and the decision factors in more detail in our roof guide - here are the three main materials:
Rock wool
Cheaper, fire class A1 (non-combustible), good vapour permeability. Recommended thickness: min. 150 mm on the roof, min. 120 mm on walls. Downside: needs a thicker layer.
PIR foam
The best insulator - 120 mm PIR is equivalent to 200 mm mineral wool. Thin, light. Also available as a sandwich panel, factory-produced between two metal skins.
EPS and XPS
Cost-effective, but with low fire resistance (class E). For corrugated sheet roofs, rock wool and PIR are the primarily recommended options.
Rain noise - how loud is it and what does it depend on
A corrugated sheet roof can be louder in rain than a tile or shingle roof - but it is not inevitable. The level of noise is largely determined by the roof build-up and the workmanship, not just the sheet itself.
What can you do to make it quieter?
There are a few tricks you can use to significantly reduce the noise of a corrugated roof - although in most applications (shed, stable, outbuilding, etc.) rain noise is basically a secondary concern.
- Thicker sheet: Sheet thickness matters here too: a 0.5 mm sheet is stiffer and vibrates less than a thinner, say 0.3 millimetre piece. Choosing a higher profile (for example T18 instead of T14) also helps reduce the noise.
- Close battening and accurate fixing: The smaller the span between purlins and the more accurately the screws are tightened, the less the sheet vibrates. Loose screws and wide batten spacing are the two most common reasons a roof "drums".
- Closed boarding under the sheet: If the sheet sits on a continuous surface (OSB or plywood), it cannot resonate freely. Combined with insulation, the roof is essentially silent.
- Thermal insulation: Even a 15 cm mineral wool layer greatly reduces sound transmission. For a heated building this is mandatory anyway - so if your roof is insulated, noise will not be a problem.
On a properly built residential roof, rain noise is barely different from a tile roof - many people are surprised by this. In an unheated outbuilding without insulation, the above is how you can make the roof quieter - but in most cases it is not a significant problem anyway.
Corrosion protection
Corrugated sheet is not a single layer of metal - the steel core is protected by both galvanising and the colour coating. As long as these layers are intact, the sheet does not rust. But if you damage either of them - by grinding, scratching or chemical attack - corrosion starts at that point.
Different metals next to each other
If two different metals come into contact in the presence of moisture, one accelerates the corrosion of the other. This is called galvanic corrosion, and it happens on roofs more often than you would think:
- Copper and steel/zinc/aluminium must not come into contact. Copper corrodes other metals very aggressively. Direct contact is not even needed - rainwater running off a copper gutter already causes visible streak damage on the steel below it.
- Do not use plain steel screws with galvanised sheet. Uncoated black steel screws rust sooner than the sheet itself and draw a rust streak across the surface. Always use an EPDM-sealed, galvanised or painted self-drilling roofing screw.
- Do not mark the sheet surface by scratching. A knife, nail or graphite pencil can damage the coating, and rust will start there. For marking use a felt-tip pen or chalk - these wash off and do not damage the surface.
Cement, mortar and chemicals
If masonry work is being carried out near the sheet, cover the surface with a protective film. Fresh cement and mortar are alkaline - if they splash onto the sheet and dry there, they attack the coating and leave permanent stains. Wash off any contamination immediately with plenty of water. Only use pH-neutral cleaning agents on the metal roof - both strong alkaline and acidic products damage the coating.
Coating types and their lifespan
The lifespan of the sheet is largely determined by the coating type. For residential use, polyester coating is the best value-for-money option:
| Coating | Thickness | Expected lifespan | Typical use |
|---|---|---|---|
| Polyester (PE) | 25 µm | 20-25 years | Residential roof, fence - the general choice |
| PVDF | 25-35 µm | 30-40 years | High UV load, coastal environment |
| Plastisol | 150-200 µm | 30+ years | Industrial, chemical exposure |
| Bare galvanised | - | 15-25 years | Agricultural, temporary structures |
Snow guards
According to OTÉK (the Hungarian National Urban Planning and Construction Requirements), roofs with a pitch of 25-75° must have a snow-guard row if the eaves border a traffic area and are higher than 6 metres. On a smooth metal roof the risk of snow slide is higher than on tile anyway, so we tend to recommend a denser arrangement.
Three types exist: snow-guard hooks (1.5-2 pcs/m²), snow-guard grid (every 3-4 metres) and snow-guard pipe (2-3 parallel pipes on brackets). A condominium rule or a local regulation can override the general rule - it is worth checking in advance.
Fence installation
A corrugated sheet fence is one of the best value-for-money solutions: durable, needs no painting, does not rot, and if you fit it with care, it can stand for decades. But there is one thing many people underestimate: wind load. A solid metal fence is essentially a wall-sized sail. Wind load is the primary sizing factor - and that is why so many DIY metal fences fail prematurely.
Posts and frame
The posts form the foundation of the fence. If you make a mistake at this stage, it will be very hard to correct later.
- Post spacing: Maximum 2.5 metres, but ideally 1.8-2.2 metres. With a wider gap, the sheet vibrates in the wind and the fixing fatigues over time.
- Post material: Hollow section steel post (60×40 mm or 60×60 mm) is the most common. Concrete it in at least 60-80 cm deep - below the frost line. Put a gravel drainage layer at the bottom of the hole, and let the concrete cure for a full 24 hours before fixing anything.
- Horizontal rails: At least two rows are needed: bottom and top. For fences above 180 cm, three rows are recommended. Material: 40×20 mm hollow section, welded or bolted to the posts.
- Straightness: Pull a string line between the corner posts. If the line of posts is not straight, the tops of the sheets will look wavy - and it shows from the street too.
Fitting the sheet
On a fence the sheet is mounted vertically - the ribs run from top to bottom. This is not only better looking, it also sheds water better.
Check the first sheet with a spirit level - if it goes up crooked, you have to redo them all. The bottom of the sheet should be at least 5-10 cm above the ground, otherwise it is constantly exposed to water and mud splashes, which is not only unattractive but also a breeding ground for corrosion. The cut edges here are the most vulnerable, so always paint them with touch-up paint or zinc spray. If you cannot level the ground, it is worth building a concrete plinth or fence base along the bottom. If you use a U-profile at the bottom, drill drainage holes so rainwater cannot stand in it.
Overlap and closure pieces
The side overlap here is also one full rib - that comes from the profile. On top of the fence, fit a top cap (upper closure piece): this covers the cut edges, prevents water running in from above between the sheets, and crucially also stops raindrops getting into the hollow sections of the posts.
Also close the top of the posts - if left open, rainwater collects in them, freezes in winter and splits the section. Welding, a plastic cap or a silicone plug: it does not matter, just close it.
What sheet should I choose for a fence?
| Aspect | Recommendation |
|---|---|
| Profile | T18 - stiff enough and still looks good |
| Thickness | 0.45-0.5 mm - anything thinner tends to vibrate in the wind |
| Coating | Polyester (PE 25 µm) - more than enough for a fence |
| Height | 150-200 cm is the most common |
Colour choice matters on a fence too: darker colours (brown, anthracite, dark green) show dust and splashed mud less. Light grey and white have a very elegant look, but need more care.
Gate
The gate posts should be stronger than the fence posts: use 80×80 mm or 100×100 mm hollow section, concreted in at least 80 cm deep. Given the gate's weight and the load from opening and closing, this is not the place to cut corners. Size the gate leaf frame so that it does not warp when the sheet is fitted - it needs a diagonal brace.
Wall cladding and other uses
Corrugated sheet is not just for roofs and fences. It also works excellently as wall cladding, facade cladding, garage wall or warehouse side wall - and it is much easier to install than a roof because there is no wind exposure on the roof surface, no pitch, and watertightness is not as critical.
Vertical or horizontal?
Both work, but there is a difference:
Vertical ribs
The ribs run from top to bottom. Water drains better, and the look is more industrial and modern. You fix the horizontal rails to the posts, wall or existing structure, and screw the sheet to those.
Horizontal ribs
The ribs run sideways. Gives the building a wider look, but at the overlaps you have to make sure the upper sheet covers the lower one - otherwise water stands in it. Vertical rails are needed for this.
Fixing on a wall
For wall cladding, the screw goes where the sheet rests on the rail. Into every second rib, fixed to the rails. Use 5-7 screws per square metre.
If you are fitting to an existing wall, you will need a sub-frame: timber battens (min. 40×60 mm, fungicide-treated) or metal C-profiles, fixed to the wall. Place the supports 50-80 cm apart depending on the sheet profile.
The zero line
Strike the bottom reference line (zero line) with a chalk line and spirit level and set the sheets to it. An uneven base gives a wavy, amateur look - and it cannot be corrected afterwards.
Overlap on wall cladding
Sideways it is still one full rib, as everywhere. For longitudinal (vertical) overlap, minimum 100 mm is enough - no sealing tape is needed, because water does not stand on a vertical surface the way it does on a roof. With horizontal ribs, however, pay attention: at the overlap, the upper sheet must always go on the outside.
Mistakes that void the warranty
Most manufacturer warranties are immediately voided if you commit any of the mistakes below. Manufacturer inspectors recognise these easily - it is not worth trying.
- Cutting with an angle grinder - the no. 1 warranty killer, the spark-burn pattern is instantly recognisable
- Wrong fasteners - wrong type, wrong length, missing EPDM washer
- Installation below the minimum pitch without sealing measures
- Inadequate ventilation leading to condensation - manufacturers treat this as the owner's responsibility
- Improper storage causing pack rust before installation
- Unauthorised modifications - cutting a roof window, retrofitting a satellite dish
- Pressure washing or the use of strong chemical cleaners
- Failure to register the warranty - with some manufacturers you have to register after purchase
Worth knowing: most material warranties are prorated - the longer you have used it, the less the manufacturer pays. And the warranty typically only covers material replacement, not the installation labour. A claim is a lot of hassle even in the best case - better to avoid it.
Work safety
Above a one-metre height difference, fall protection is already required. This is not a recommendation - it is a legal obligation (Hungarian Regulation 4/2002 (II. 20.) SzCsM-EüM). Even a fall from 2 metres onto concrete can cause a fatal head injury.
The correct hierarchy of protection
- Work from below, if possible - from a scaffold or cherry picker
- Collective protection - guardrail, safety net (protects everyone, no personal equipment required)
- Personal protection - harness, fall-arrest lanyard (only if the above are not feasible)
Personal protective equipment
- Safety helmet
- Harness with a fall arrester
- Non-slip work boots - soft-soled, with a steel toe cap. Before stepping onto the sheet, check the soles - an embedded pebble scratches straight through the coating.
- Cut-resistant gloves - cut sheet edges are extremely sharp and slice skin without effort
- Safety goggles when cutting and drilling
- Hearing protection for power tools
Fragile surfaces
If you go up onto an existing roof to repair or replace, never assume it will take your weight. Fragile surfaces can include rooflights, old (painted) roofs, corroded metal sheets and fibre-cement roofs. On thinner material, use load-spreading crawling boards that rest on at least two supports.
Work left half-finished
A sheet that overhangs and is not yet fixed must be secured immediately so it does not tip up. Organise the work so that by the end of the day, every sheet laid is fixed down. Weigh down opened bundles against the wind. If the wind picks up during work, the right decision is to stop and not risk an accident.
Maintenance
A big advantage of corrugated sheet - be it roof, fence or wall cladding - is that there is almost nothing to do with it after installation. But almost nothing is not zero - check on it twice a year. The whole inspection takes no more than 15-20 minutes:
- Any loose or crooked screws? Are the EPDM washers free of cracks?
- Are the flashings in order? Any movement?
- Can you see any rust spots, especially at cut edges and screw heads?
- Is the gutter clear? Does the water run off properly?
- From inside: any water stains or mould? These indicate leaks.
Cleaning: once a year is enough, with plenty of clean water and a soft sponge or brush. More often near trees - resin and leaf build-up damages the coating. Clean off bird droppings immediately, because the acidic pH corrodes the surface. Never blast a pressure washer into the overlaps, and do not use a wire brush, steel wool or strong solvent!
Touch-up paint: keep the manufacturer's touch-up paint on hand. Small scratches and cut edges can be repaired in place with it - a full repaint is much harder, and the shade will not be perfect anyway.
Repainting: after 15-20 years, when the paint starts to chalk. Remove rust spots, wash down with a pressure washer, coat with a rust-inhibiting primer, then apply two coats of top coat. This significantly extends the roof's lifespan and costs a fraction of a full re-roof.
A well-maintained corrugated sheet roof can serve 30-40 years. Without maintenance, more serious problems can appear after just 10-15 years - not because the material is weak, but because small faults accumulate.
Checklist - before you call the job done
To close out, we have put together a checklist that you can print by clicking the button below. After every roof, every job with corrugated sheet, go through it to make sure every point is covered - that way you can be sure nothing has been missed.
☐ No angle grinder used anywhere - every cut made with nibbler or sheet metal shears
☐ Screws are straight, the EPDM washer just bulges out but is not flattened
☐ The rows of screws are straight - checked from below as well
☐ Every cut edge has touch-up paint or zinc spray on it
☐ Metal swarf swept off the roof
☐ The overlaps face away from the prevailing wind
☐ Flashings and ridge piece in order, with butyl sealing
☐ For a heated building, a vapour barrier is in place
☐ No vinegar-smell silicone used on the metal surfaces
☐ No direct copper-to-steel contact (gutter, screw, other)
☐ On a fence: posts are in line, sheets stand vertical
☐ On a fence: the bottom of the sheet is at least 5 cm above the ground
☐ On a fence: the tops of the posts are capped
Got an installation question? Request a quote!
Free, no obligation - no personal details required
Standards and sources
This guide is based on the following standards and technical sources:
- MSZ EN 14782 - Self-supporting metal sheet for roofing and wall cladding (CE marking)
- MSZ EN 1090 - Fastening patterns and load transfer points for load-bearing profiles
- EN ISO 12944 - Corrosion protection of steel structures (C1-C5 corrosivity categories)
- EN 10346 - Hot-dip galvanised coated steel products
- Hungarian Government Decree 275/2013 (VII. 16.) - Marketing of construction products (CE, declaration of performance)
- OTÉK (253/1997.) - Roof pitches, thermal insulation, snow-guard requirements
- Hungarian Regulation 4/2002 (II. 20.) SzCsM-EüM - Safety rules for work at height
Related guides
If you have any questions, we are happy to help. If you are looking for good quality sheet at a fair price, we recommend ourselves!
Frequently asked questions
How many screws per square metre?
On a roof, on average 10 pcs/m², so one box of screws (250 pcs) is enough for about 25 m². At the middle of the roof 6 pcs/m², at the edges 8, at the corners 10 - but to keep it simple, count with 10. On walls 5-7 pcs/m².
Can you cut corrugated sheet with an angle grinder?
No. The sparks burn into the coating, and within six months rust appears everywhere a spark landed. Use a nibbler or an electric sheet metal shear - or ask us to cut it to size, that is free.
Do I need a membrane under the corrugated sheet?
For a heated building, yes: vapour barrier on the inside, breather membrane on the outside. For unheated buildings (garage, shed) anti-condensation felt is the most practical solution.
How much overlap is needed lengthways?
Above 15 degrees at least 150 mm, between 10-15 degrees at least 200 mm with butyl sealing tape, below 10 degrees at least 300 mm with a double row of butyl tape. Sideways it is one full rib - this is factory-formed, you do not need to think about it.
What is the minimum roof pitch?
For the T18 profile, at least 6 degrees. On anything flatter, water stops and runs back at the overlaps. The ideal range is 15-25 degrees - steep enough for the water to run off properly, but not so steep that installation becomes difficult.
What sheet thickness should I choose?
For residential use we recommend 0.5 mm. We cover this in detail in our type-selection guide - the gist: we had plenty of complaints about the 0.4 mm, almost none about the 0.5 mm.
What post spacing is needed for a fence?
Maximum 2.5 metres, but 2-2.2 metres is ideal. Any wider and the sheet vibrates in the wind, and the horizontal rails can bend over time. Concrete the posts in at least 60-80 cm deep.
Screw into the valley or the top of the rib on a fence?
On a fence and wall cladding, the screw goes into the top of the rib - exactly the opposite of the roof. The reason is that the screw has to bite into the horizontal rail, and that sits at the top of the rib.
Do I need planning permission for a corrugated sheet fence?
A solid fence under 2 metres usually does not need planning permission, but the local building code (HÉSZ) can override this. Especially on the street front, corner plots and in listed areas, it is worth checking with the local council first.
How much does corrugated sheet expand with heat?
A 10-metre steel sheet expands by about 6 mm over a 50 °C swing (winter to summer). On a dark roof it is more, because the surface temperature can reach 60-80 °C. With sheets longer than 8 metres pay attention to the fixed-point + sliding-point system, otherwise the sheet ripples and the screws loosen.
Is rain very loud on corrugated sheet?
On bare metal, yes, but it can be solved. Insulation + solid substrate (OSB) makes it almost completely silent. In an unheated building anti-condensation felt also helps a lot. A thicker sheet (0.7 mm) and a higher profile (T35+) also resonate less.
When do I lose the warranty?
The most common reasons: cutting with an angle grinder, wrong fasteners, installation below minimum pitch, improper storage, inadequate ventilation, and pressure washing. The warranty is typically prorated and covers only the material, not the labour.