Building a corrugated sheet roof - what we've learnt from 10 years of experience
Roofing is one of the most common uses of corrugated sheet. Garages, weekend cottages, outbuildings, industrial units, halls, and even family houses are all covered with it. But we also see that many people are simply afraid of this solution, because they've seen plenty of rusty, leaking, falling-apart corrugated roofs. In this article we sum up 10 years of experience: what a corrugated sheet roof is good for, who it's for, and the mistakes most people make - in plain language, with no waffle.

Work out your material requirement in under a minute!
Free, no obligation - no personal details required
Who is a corrugated sheet roof for - and who isn't it for?
Corrugated sheet isn't the ideal choice for every roof - sometimes tile-effect sheet is better value, and if someone wants a designer ceramic tile roof and money is no object, they'll obviously be able to build something nicer at a higher price. But if you want a durable, decades-long, maintenance-free cover very quickly and very cheaply, corrugated sheet is an excellent choice. Garage, shed, workshop, outbuilding, agricultural building, industrial hall, holiday cottage - there simply isn't a better value-for-money solution on the market for these.
It can also go on a family house - we've seen plenty of beautiful examples; matt-finish sheets in anthracite or graphite grey look particularly good on modern, minimalist buildings. But on those, you always need to pay attention to insulation and avoiding thermal bridges, so the material itself costs more and installation needs more care. Corrugated sheet is a far nicer and more rewarding material than most people think, but most people choose it simply for the price: you get a reliable, strong roof for a fraction of the cost of a tile roof.
When is it NOT worth it?
If appearance is the primary concern. You can build beautiful corrugated sheet roofs, that's not the point - but it will never compete with a premium ceramic tile. Then again, who would compare a luxury Mercedes to a small van?
If your roof pitch is very low. Corrugated sheet needs at least a 6-7 degree pitch for water to run off properly. It's still better than tile in this respect: concrete tile needs at least 22 degrees, ceramic 25-30. But below 6 degrees, water drainage becomes critical, and at that point we'd recommend a different solution.
If you sleep underneath it and don't plan on insulating. We won't lie: without insulation you will hear the rain, just as you would through a rooflight. Some people find it disturbing, but we've also had customers who specifically love it. Our experience is that roofs made from thicker material (0.5 mm and above) perform better on this front too, for obvious reasons, but correct support can also do a lot to "quieten" the roof. For a garage, workshop or storage building, though, this is hardly ever an issue.
Unbeatable value for money
You get disproportionately good quality for the money invested, especially when you consider how simple and quick installation is, and how durable this material is when fitted properly. It's not rocket science, after all: we're talking about a galvanised, painted steel sheet designed to last for decades.
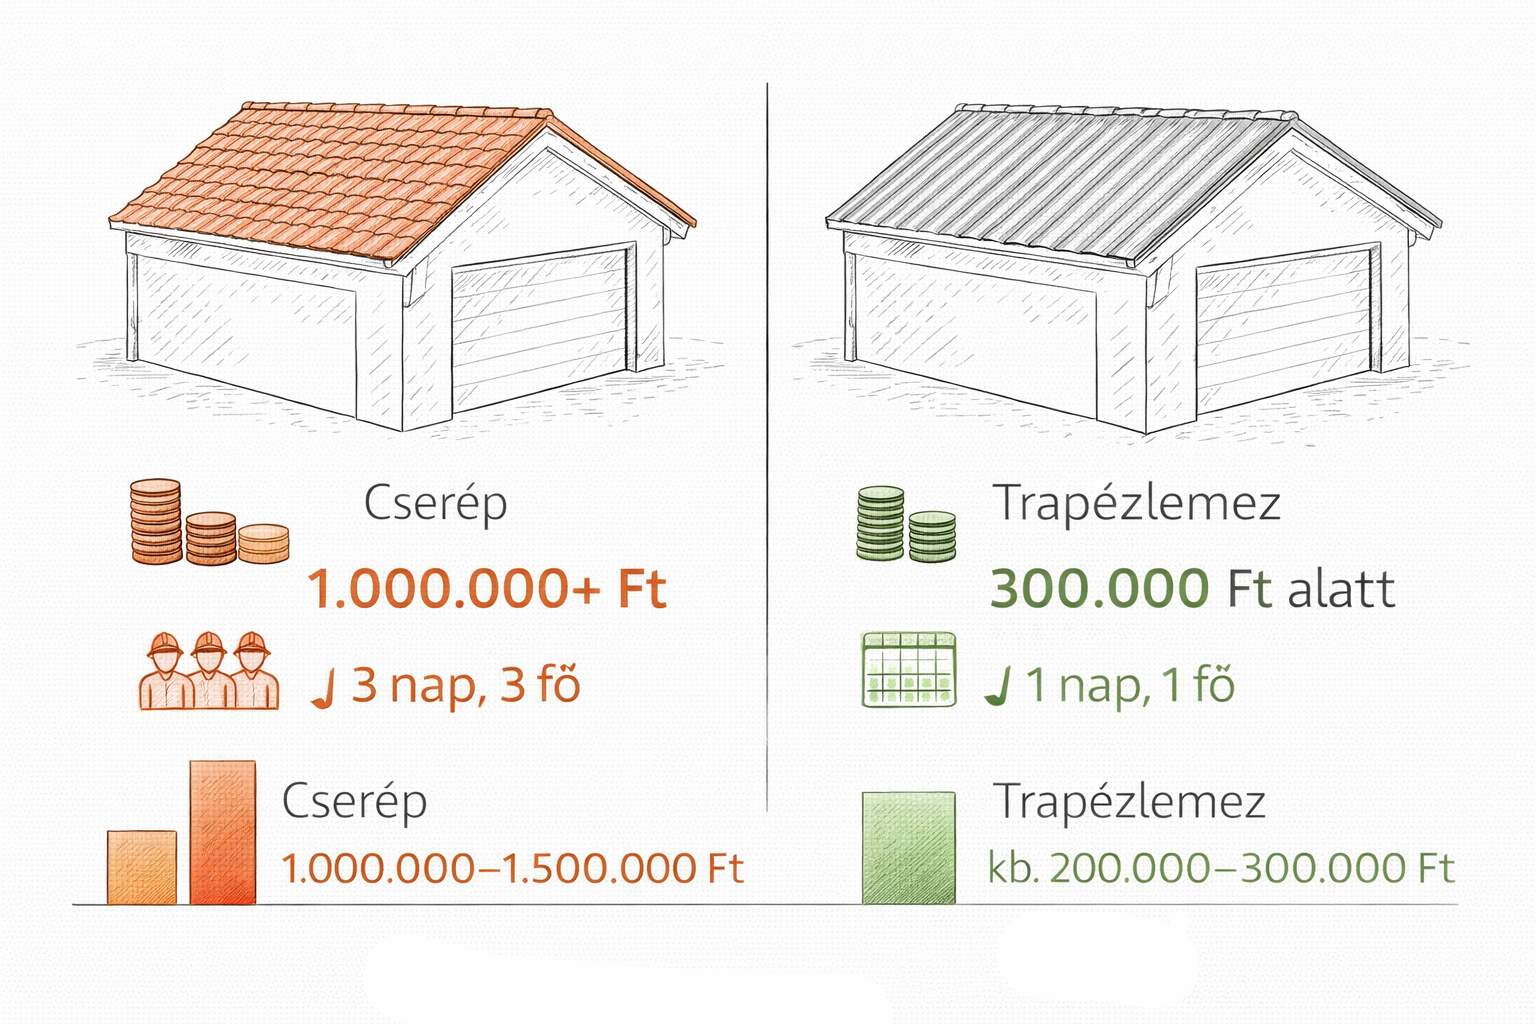
To get a feel for the difference: on a typical 50 m² outbuilding roof, tile material alone can easily be a 300 000-500 000 Ft line item, while the same job in corrugated sheet, including delivery, can be done for a half or a third of that - under 150 000 Ft. Durability is similar, potentially spanning several decades if installed correctly.
But it's important to note here that not all corrugated sheets are equal! A lot of suppliers advertise super-cheap corrugated sheets, and the less experienced buyer often doesn't notice that these are only 0.3-0.4 mm thick. Less material of course holds up to less - for instance the zinc layer can't build up thickly enough on them as on thicker sheets. That's why we sell only quality 0.5 mm and 0.6 mm sheets. They're right in that sweet spot where they're still light enough to work with comfortably at home, but thick enough to be durable and reliable - the steel under the zinc won't rust.
Just think about it: a 0.6 mm corrugated sheet contains 50 percent more steel than a 0.4 mm one!
What does it actually cost?
It depends on many factors, so we've built a lightning-fast corrugated sheet quote calculator. It takes one minute to fill in and gives you the exact material requirement and price without any risk or obligation to buy. There's no simpler method for accurate costing.
Work out what it costs
Enter the basic roof dimensions - you will get the exact quote in the calculator.
How much does the roof shape matter?
A lot - and few people talk about it. When someone plans a corrugated sheet roof, they usually think about sheet type and thickness, but the roof shape determines the final cost and the complexity of the work at least as much. For the same usable floor area, one roof shape can cost twice as much as another - not because of the material, but because of cuts, waste and labour time.
Simple gable roof - corrugated sheet's best friend
Two planes, one ridge, done. Sheets can go up at full width, barely any cutting is needed, waste is minimal: around 3-5%, which is practically unavoidable. Two people can cover an average 80-100 m² gable roof in a single day - this is where corrugated sheet's speed advantage really shines.
The simple shape also means fewer critical junctions. Two gables, one ridge, one eave line on each side - that's it. Fewer trims, fewer seals, fewer places where things can go wrong. If someone asks us what kind of roof corrugated sheet is most worthwhile for, the answer is always the same: a simple gable roof, with as few breaks as possible.
Hip roof - possible, but more complicated
The classic cube-house solution: four triangular roof planes meeting at a point. It looks nice, but from a corrugated sheet perspective this is where the compromises start.
On every plane the sheets have to be cut at an angle - at the hips (where two planes meet) the sheet on both sides ends diagonally. This means two things: first, waste jumps to 10-15%, because nothing useful comes of the triangular offcuts. Second, work is slower, because every sheet has to be measured and cut individually. What takes a day on a gable roof easily takes a day and a half to two days on a hip roof.
The hip trim is also more complicated. A gable roof needs one straight ridge trim; a hip roof has four diagonal hip lines meeting at the apex - this is a tinsmith's job and it's not cheap either. If you're planning corrugated sheet on a hip roof, it's worth getting a tinsmith's quote for the trims in advance, because the total often comes as a surprise.
Mansard roof - the most expensive, and sometimes not worth it
A mansard roof has two parts: a steep lower section (typically 60-70 degrees) and a flatter upper part. From a corrugated sheet perspective, this is the most problematic shape.
The steep lower part can usually only be fitted from scaffolding - a ladder isn't enough, because you can't hold and screw down the sheets at that angle. This alone pushes up the labour cost. On top of that, a special bent trim is needed at the break line where the steep and flat planes meet, which a tinsmith has to make bespoke. This junction is also sensitive from a waterproofing point of view: if it's not done properly, it will leak there.
Waste is also above average here - around 8-12% - and installation time can be two to three times that of a gable roof of similar size.
Honestly: if someone is planning a mansard roof and cost sensitivity is important, it's worth considering whether corrugated sheet is really the best choice for that shape, or whether tile-effect sheet might be more practical on the steep section.
Labour: do it yourself or call a tinsmith?
Corrugated sheet is so cheap in comparison that labour is often more expensive than the material itself. In 2026, an experienced tinsmith charges 3 000-6 000 Ft/m², depending on roof complexity. For a 100 m² simple roof, that's 300 000-600 000 Ft.
The good news is that with a little technical aptitude, anyone can install these sheets themselves, which means huge savings. To help with that, we've put together a separate, detailed installation guide. But if you're not sure, call a professional - a badly fitted roof isn't saving money, it's paying twice.
Roof cover cost comparison
Material + support structure + extras + labour = total cost
Settings
Edit prices
How did we calculate?
It can last 40-50 years
We have a customer who recently told us that his father put corrugated sheet on his barn back in the early 90s, and it's still standing today. That's exactly the point: a good material goes up once, and then you don't have to touch it for a long time. The wind won't blow it off, tiles won't fall off - but for that you need the material to be thick enough and properly screwed down.
According to the big international manufacturers - Kingspan, Tata Steel, ArcelorMittal - a well-installed corrugated sheet can last 40-50 years. To be honest, we don't consider 40-50 years entirely realistic, but we're happy to give a 20-year warranty on our own sheets, because we know what they're made of, and our own experience also shows that these steel sheets easily hold up.
What's realistic:
- Natural galvanised, rural environment: 20-25 years
- Polyester coating, normal environment: 20-30 years
- Matt polyester, normal environment: 25-35 years
- PVDF coating, normal environment: 35-40+ years
Important: thickness on its own doesn't increase lifespan, only load-bearing capacity. Lifespan is determined by the zinc layer and the paint coating. A well-coated 0.5 mm sheet will last longer than a poorly coated 0.7 mm one.
Fast installation, less labour cost
The other huge advantage of corrugated sheet is speed. We had a customer recently who ordered on Friday, received the sheet on Saturday, and had the garage roof finished by himself by Sunday evening. Not everyone is that good a handyman, but the point is that you can move very quickly with corrugated sheet. No glue, no drying time, no lugging small pieces up one at a time like with tile - large areas can be covered quickly and reliably.
This is also important because labour is often more expensive than the material itself. If a tinsmith finishes in one day instead of three, that's a serious saving compared with three people laying tiles one by one. So fast installation doesn't just save time, it saves money too.
Work out your material requirement in under a minute!
Free, no obligation - no personal details required
Which sheet should I choose?
This is the most common question we get. The answer isn't complicated, but it's important to understand why thickness, profile and coating matter so much.
Sheet thickness - don't skimp on this
0.2-0.3 mm - We'd recommend this for wall cladding at most. Very thin, bends, cracks, and zinc doesn't hold on it properly. Within a few years it can be rusty if put somewhere it doesn't belong. Most corrugated sheet failures are born of this: someone thinks it's all the same as long as it's corrugated sheet, puts a thin sheet up as roofing, then the wind tears it off, bends it, it rusts - and then they curse everyone and swear never to use corrugated sheet again. Cheap or not, fitted in the wrong place it's money thrown away.
0.4 mm - Usable, but the lower limit of what's worth putting up. Compared to thicker sheets, age shows on it sooner, and the more storms it takes, the faster problems come. We're not saying it's bad or unusable, but our personal experience is that you can have a lot of trouble with it.
0.5 mm - this is what we recommend. That's exactly why we sell only 0.5 mm and thicker sheets - simply because, based on years of experience, this is what we trust. Strong enough not to bend even in serious wind, thick enough for the zinc to protect it properly, and still light enough to work with comfortably.
0.6-0.7 mm - These are serious materials, suitable even for industrial use. Stronger, stiffer, handle larger rafter spans. We often keep 0.6 mm sheet in stock as well and sell it at the same price as 0.5 mm - the only restriction is that not every colour is available in it.
But why exactly 0.5 mm?
Simple answer: a decade of experience points to it. We used to work with 0.4 mm sheet too, and we had a lot of complaints about it: bending, denting, early rusting. It simply wasn't worth the hassle. The 0.2-0.3 mm category we avoided from day one, because we knew it wasn't the real deal.
What's more, most distributors sell 0.4 mm for the same price or more than we sell 0.5 mm. It's no question which is the better deal.
0.6 mm really matters where stiffness is explicitly important - for example when rafters are further apart. That extra 50 percent (!) of material thickness compared to 0.4 mm is a serious stability advantage.
But in most cases 0.5 mm is the winner: the sheet is stiff enough, the galvanised layer is adequately thick, and the price is still acceptable. That's why we decided to work exclusively in this thickness and above - we don't even sell thinner.
Profile height - why the rib matters, and what's the T-number?
In corrugated sheet names, the T-number denotes the rib height in millimetres. The higher the rib, the stiffer the sheet and the better it sheds water. But note: rib height on its own isn't enough to look at - a 0.4 mm T20 sheet is still much weaker than a 0.6 mm T18, simply because of the amount of material. So profile and thickness always need to be looked at together!
T8-T14: Good for wall cladding, possibly fencing. Don't put them on a roof - they don't belong there. Care is needed on fencing too: if wind hits it side-on, T8 breaks down quickly, T14 just about works, but we always recommend T18 instead.
T18 - the most common roof profile: The best of both worlds: light enough to use on DIY projects, but strong enough to cover a serious building. Excellent for roof pitches above 7 degrees, and not insignificant: accessories are most readily available for this size. It's no use if someone sells a T25 sheet if you can then barely find trims or ridge pieces for it.
T20: Also a good choice, but in most cases interchangeable with T18, while T18 is cheaper.
T35 and above: For large-span applications on industrial and commercial buildings. We don't even stock these - they're specifically for hall cladding, industrial dimensions.
We've written more on profile choice in our article comparing corrugated sheet types.
Coatings - the roof's immune system
The average person tends to know the least about coatings, yet alongside thickness and material quality, it's the coating that determines whether the roof will last a few years or decades.
Zinc coating (galvanising) - This is the base protection. Every steel sheet gets a zinc layer, which protects it from rust, but how much goes on and how well it stays on varies. All our sheets are galvanised.
Aluzinc coating - Contains fifty percent more aluminium, which provides longer life, but it's accordingly much more expensive.
Paint coating - Goes on top of the galvanising, and doesn't just give the colour but UV protection too. Three types are worth knowing:
Polyester: The most widespread, economical solution. Perfectly suitable for general use, starts to fade slowly after 10-15 years.
PVDF (25-35 micrometres): The premium category, with warranties up to 20-40 years. Doesn't fade, doesn't peel. Worth it in coastal or industrial environments, or when it's explicitly important that the roof still looks the same 30 years later. The price is premium to match.
Plastisol (200 micrometres): The thickest coating, almost rubbery to the touch, extremely hard-wearing. But UV-sensitive, so only recommended in darker colours, and we don't usually suggest it for everyday use.
For most Hungarian homeowners we recommend the polyester-coated, plain 0.5 mm sheet. In this, the galvanising and the paint layer together protect the steel from rusting, and in our experience it's the best value for most projects.
We've written in more detail about prices and sheet choice in our "Corrugated sheet prices - what they depend on and how to save" article.
Already know which sheet you want? Work out the price!
Free, no obligation - no personal details required
Corrugated sheet, tile-effect sheet, standing seam - what's the difference?
This question comes up often, and there is indeed one important thing in common: all three can be made from galvanised, painted steel sheet. The difference, however, isn't just in form, but in the waterproofing system, the way it's fixed, the use cases and the price.
Corrugated sheet
Corrugated sheet is an industrial, modern-looking cover whose big advantage is fast and economical installation. It's built as an overlapping system, fixed with visible screws. Done properly, it's a durable solution, but it's mostly chosen for outbuildings, garages, halls and agricultural buildings.
It's generally the cheapest roofing form among metal sheets.
Tile-effect sheet
Tile-effect sheet gives the look of traditional tile cover but with the light weight of metal sheet. Also an overlapping system, with more waterproofing details and a more articulated profile. Many people choose it as the main roof covering for family houses because it fits residential surroundings better while loading the structure less than concrete or ceramic tile.
Price is typically mid-range: more expensive than corrugated sheet, but often cheaper than standing seam or premium tiles. The recommended minimum pitch is usually around 14-17°, depending on type.
Standing seam sheet
Standing seam is a clean, modern-looking cover where sheets are closed with interlocking folded seams. Fixing is hidden, so waterproofing is safer and the system also handles thermal expansion better.
This cover can be used at lower pitches (generally above around 5-7°, and with special systems even lower). At the same time, it's among the most expensive solutions, and installation is also more time-consuming and requires greater skill.
When is each worth choosing?
Outbuilding, garage, agricultural building: corrugated sheet is usually the best value-for-money choice.
Main roof on a family house, traditional surroundings: tile-effect sheet is often a good compromise between looks and cost.
Modern building, low pitch, premium appearance: standing seam offers the most aesthetic and technically most advanced solution.
How much sheet should you order?
Bad quantity estimation causes two kinds of trouble: if you're short, work stops and you have to re-order expensively. If you've got too much, the surplus sits there.
Roof area: Roof area isn't the same as floor area - because of the pitch, the roof is larger. Measure the length of the roof (along the eaves) and the length of the slope (from eaves to ridge, measured along the roof plane, not horizontally). Multiply, and for a gable roof multiply by two.
If you only have a horizontal measurement, the correction factors are: x1.015 at 10° pitch; x1.06 at 20°; x1.15 at 30°; x1.41 at 45°.
Number of sheets: Our sheets are 116 cm wide, but the usable cover width is 110 cm (the remaining 6 cm is the overlap). Divide the roof length along the eaves by 110 cm - that gives the number of sheets for one roof plane.
Ideally, order the sheet length so it covers the full eaves-to-ridge distance in one piece. We can cut sheets to length up to 8 metres. If the roof is longer than that, you need two sheets, and in that case allow 15-20 cm for overlap.
Waste: On a simple gable roof, 3-5% allowance is enough. On a hip or pyramid roof, 10-15%.
What accessories do you need alongside the sheet?
We write this section in this much detail because every week we get a phone call along the lines of "I bought the sheet, but now it turns out I need this and that too." A sheet on its own is just a sheet. Waterproofing, wind resistance and durability are what the accessories provide. Anyone who skimps on these is skimping on the roof itself.
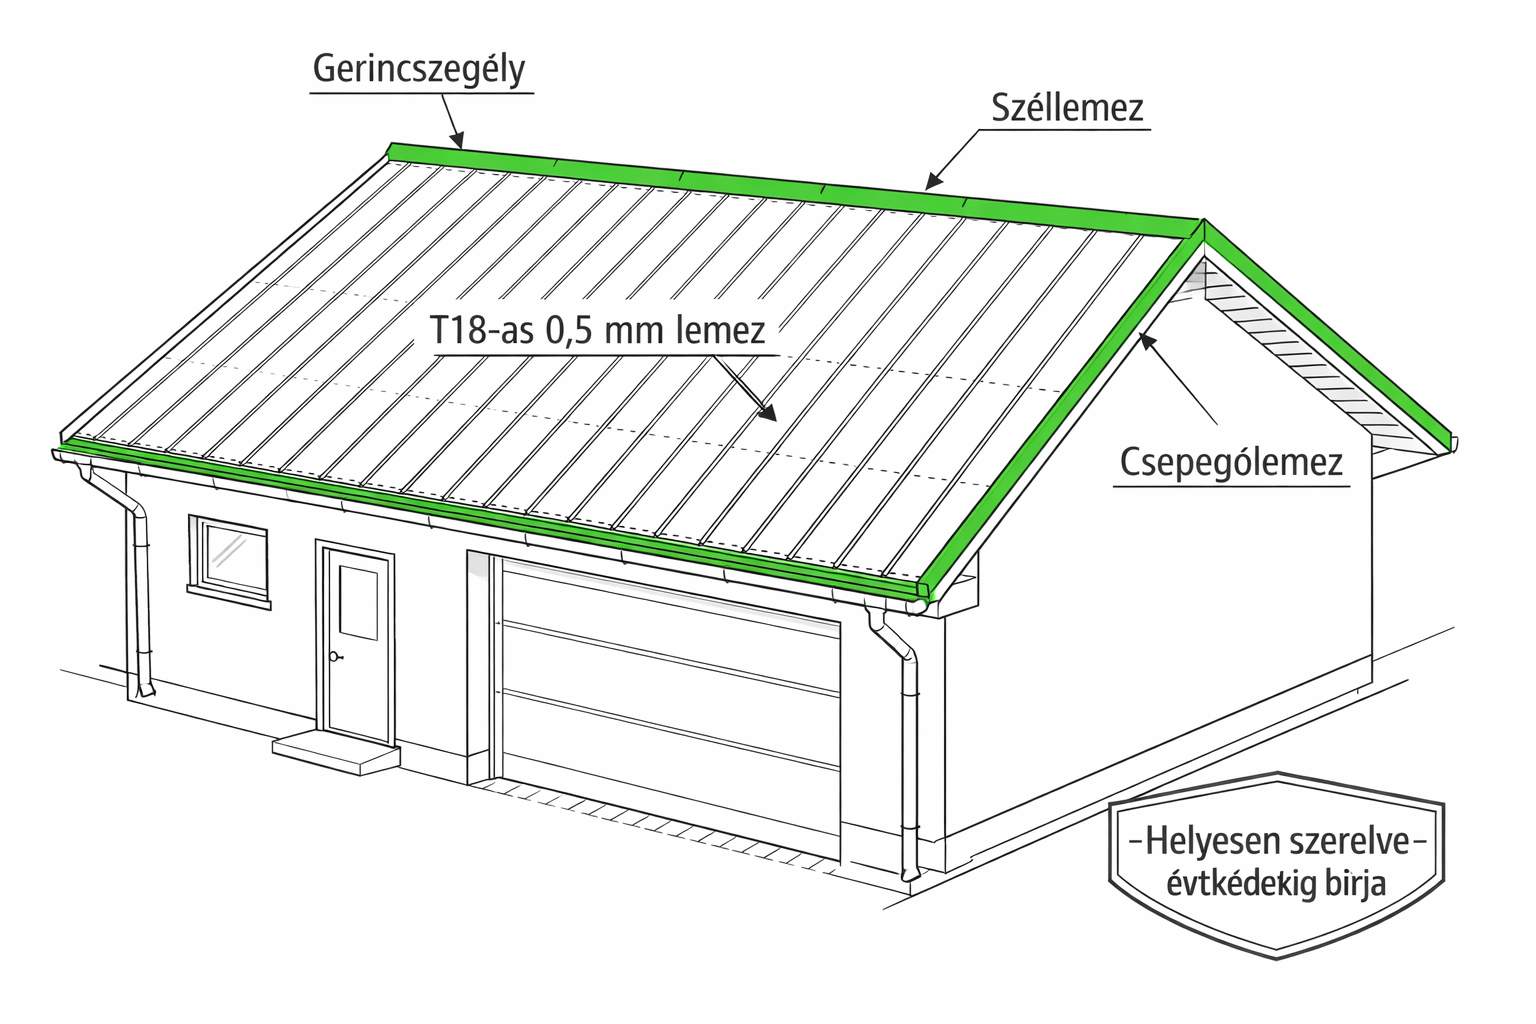
Ridge piece - closing the top of the roof
At the top of the roof, where the two planes meet, there's a gap. If there's nothing there, rain falls in through it, wind blows in, snow drifts in, and birds climb in.
It comes in two-metre lengths, overlapped by 15 centimetres, screwed onto every second rib.
Gable trim (verge flashing)
The gable trim closes off the two edges of the roof along the gable walls. Without it, two things happen: the wind gets under the sheet and starts lifting it, and rain runs in at the edge. In a storm this is serious - we've seen whole sheets fly off because the edge wasn't properly closed.
Two-metre lengths with 10 cm overlap. One side screws onto the top of the sheet, the other onto the barge board. Simple but important.
Drip edge (eaves flashing)
This sits on the lower edge of the roof and is there so water flows into the gutter rather than running back under the roof. If it's missing, water curls back over the bottom edge of the sheet, creeps under the roof and soaks the timber structure. What happens to the rafters after a few years of that doesn't need spelling out.
Remember one thing: the drip edge has to be fitted before the roof sheets. Loads of people get this wrong - they put the roof on and then try to slide it under afterwards, and it doesn't go on properly.
Wall abutment flashing
Not relevant for everyone. But if the roof butts against an existing wall - typically on an extension, or a shed built against the house wall - the gap between the wall and the roof has to be closed off. If it stays open, that's where water will come in.
A piece of advice that most DIYers don't know: fix the wall flashing to the wall, not to the roof. The sheet moves with thermal expansion - sometimes by centimetres in summer - while the wall stands still. If you screw it to both, the seal will eventually rip apart. We've seen it many times.
Roofing screws with EPDM washers - don't skimp on these
The screw isn't an accessory but the actual foundation - but we include it here because a bad screw is just as much trouble as a missing trim. Self-drilling screws with colour-matched heads and EPDM rubber washers.
Onto timber purlins: 4.8 x 35 mm. Onto steel frames: 4.8 x 19 mm. Roughly 10 screws per m². Our box holds 250 pieces, enough for about 25 m².
The EPDM washer matters because it doesn't dry out, crack, and is UV-stable. Screws with cheap plastic washers crumble within 3-4 years, after which every hole drips. We had a customer who got caught out this way - the entire roof had to be re-screwed.
Foam closure strip - the invisible accessory
Nobody thinks this is important until they see what happens without it. Where a trim meets the sheet - ridge, eaves - open gaps are left in the corrugations. The closure strip is a foam strip cut exactly to the sheet's profile. It's air-permeable - so it doesn't choke ventilation, it just keeps out what belongs outside.
Butyl sealant tape
Sticky, black, thin tape. It goes where two sheets overlap, or where a trim meets the sheet. Especially important on low-pitched roofs: below 14 degrees water can climb back up at overlaps, and it's the butyl tape that prevents this. It doesn't dry out, stays flexible, and follows the movement caused by thermal expansion.
Snow stops
Snow doesn't melt off a smooth metal roof the way it does from tile. It slides off in one go, sometimes in masses of several hundred kilos, without warning. If there's a path under the eaves, or parking, or an entrance, it's no joke.
There are three types: snow hooks (for smaller roofs, 1.5-2 pieces per m²), snow bars (along the entire eaves line, the most common), and snow tubes (the strongest, for areas with heavy snow load).
If there's anything under the eaves you don't want crushed, put them on.
What else might come up
If a chimney, vent pipe or antenna passes through the roof, it needs an EPDM rubber collar. Not expensive, but without it every penetration leaks.
Every cut damages the zinc layer. These spots are worth treating with touch-up paint. A few minutes' work can add years to the roof's life. Always turn the cut edge to the inside of the roof - what the rain doesn't lash lasts longer.
How much do the accessories cost in total?
On a simple gable roof (50 m²), as a rule of thumb the accessories cost 15-25% of the sheet price. That's 20 000-40 000 Ft. For a complex roof shape - lots of corners, chimney penetrations, wall abutments - it's more than that.
We cut sheets to size for free with your order!
Free, no obligation - no personal details required
What to know before installation
Before you start screwing, there are a few things worth thinking through. We see these mistakes regularly, and they regularly make the fitter's life miserable and shorten the sheet's lifespan.
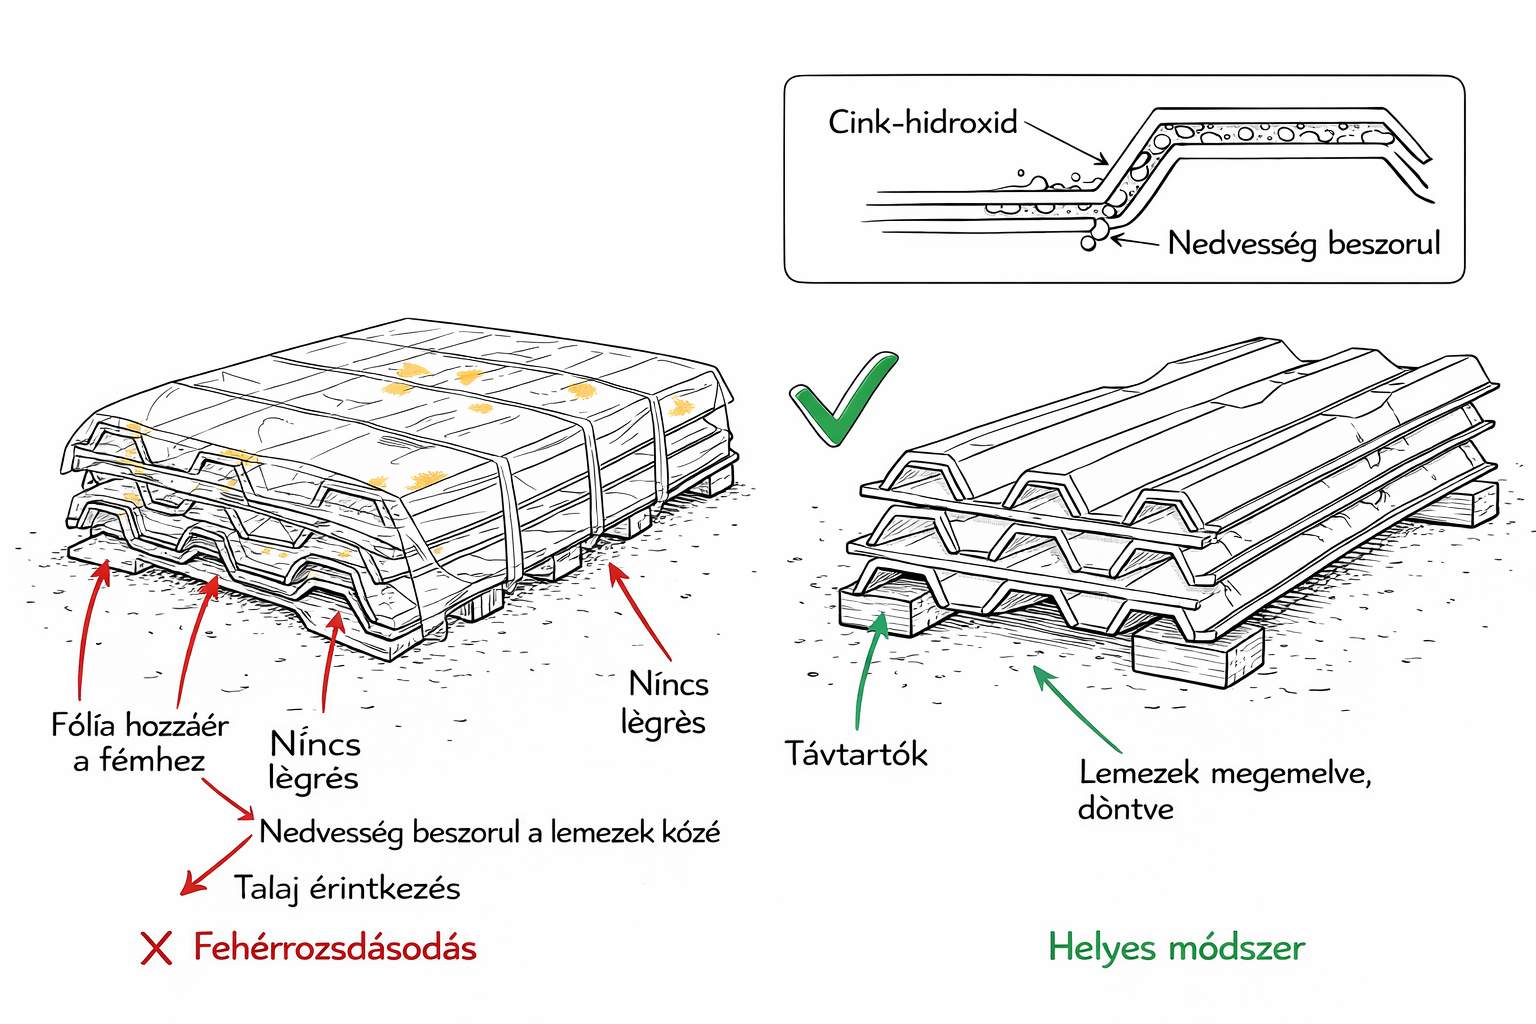
Storage
One of the most common complaints: the customer has the sheet delivered in autumn, puts it in the garden, covers it with plastic sheeting, then in spring when they finally have time for it they find white patches on it. This is white rust (zinc hydroxide), and manufacturers exclude it from warranty without exception.
How to avoid it:
Store the sheet at least 20 cm off the ground, on boards or pallets, separated from the soil. Tilt it by at least 3-4 degrees so water runs off. If storing for more than two weeks, put dry timber laths between the sheets. Never cover it airtight - if you do cover it, leave a ventilated layer underneath. If the package got wet during transport, unpack it immediately and dry it.
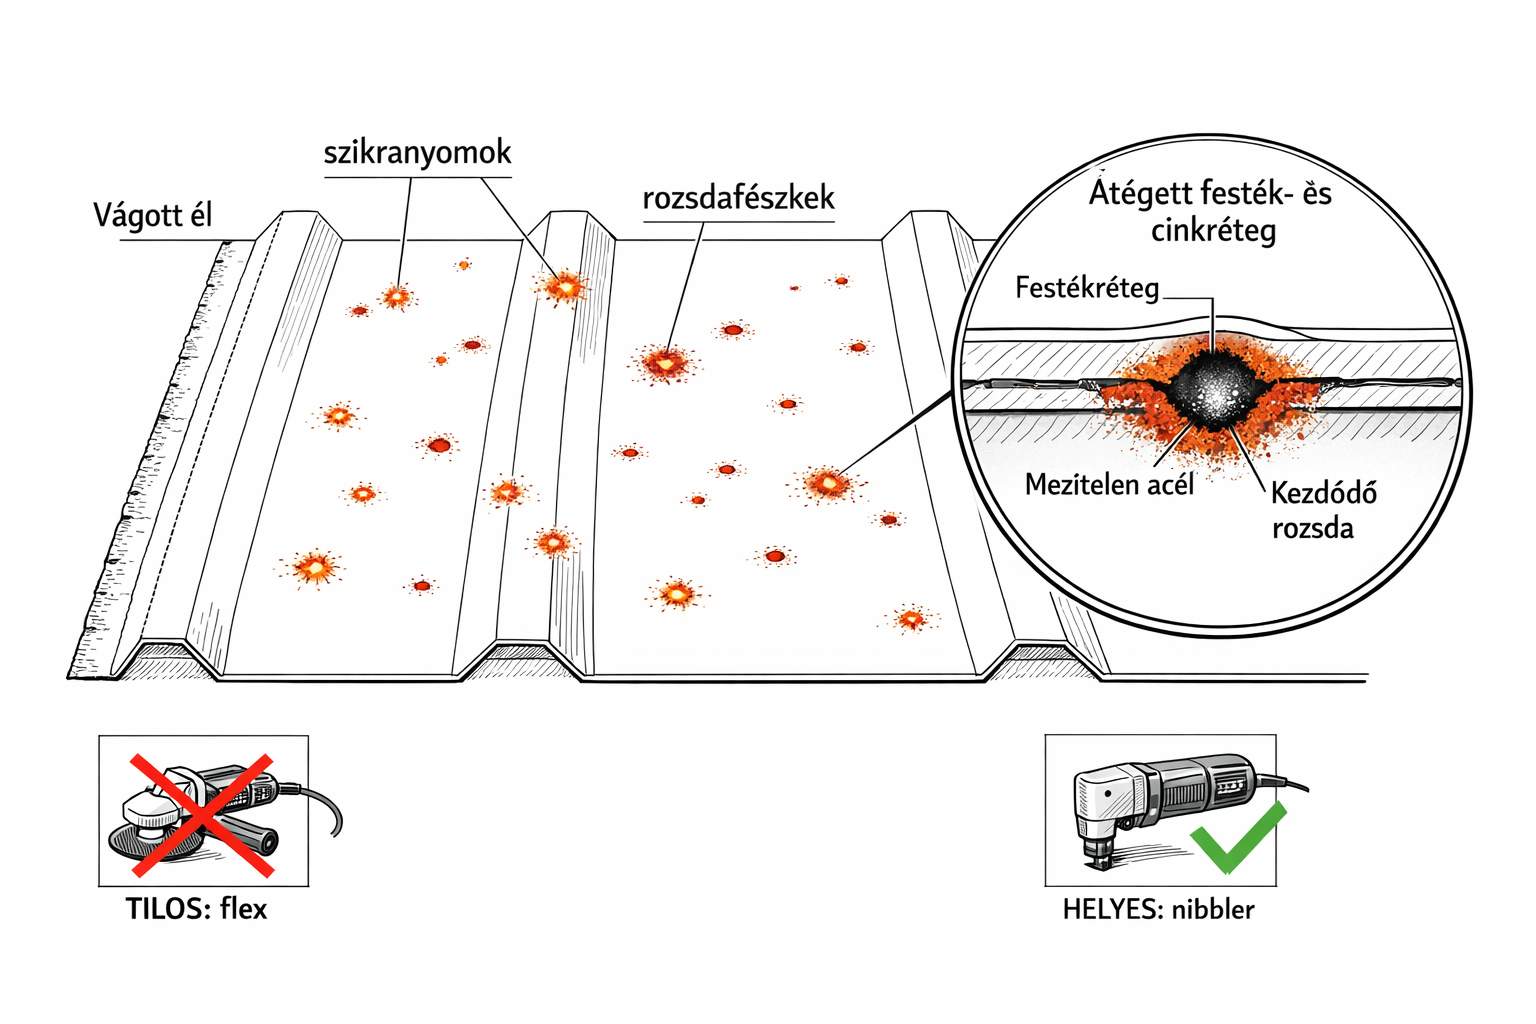
Tools and the no-go list
You only need a few basic tools to install corrugated sheet: a torque-adjustable screwdriver, tape measure, chalk line. If you need to do a lot of cutting, an electric nibbler is the best solution - it cuts out small crescent-shaped pieces and doesn't distort the sheet.
Strictly forbidden: the angle grinder. Every major manufacturer explicitly forbids the angle grinder, and using it voids the warranty immediately. Hot metal sparks scatter across the sheet surface, burn into the paint and zinc layer, and every such point becomes a tiny rust nest. Within half a year, the whole roof can be covered in rust spots - not only along the cut line, but everywhere a spark landed.
Use electric or hand sheet shears instead. But the simplest solution is to have us cut your sheet to size free of charge - you don't have to spend time on it, and it'll be done professionally.
If you do cut on site, the cut edge should always go uppermost, with the painted surface facing up.
Don't work in wind
A corrugated sheet is a little over a metre wide and up to six to eight metres long - in wind, it's effectively a sail. Even light wind makes it seriously dangerous. Nobody should go up on the roof when the wind can catch the sheet! This isn't unnecessary fussing: even the wind snatching the sheet from your hand and slicing your hand is a serious injury - let alone sweeping someone off the roof.
Keep sheets low, perpendicular to the wind, and never grab after a runaway sheet.
Screwdriver, not an impact drill
Many people drive the screws with a cordless impact drill, which is a serious mistake. The impact drill overdrives the screws, crushes the EPDM washers, and you can't feel when it's enough.
Ideal tool: a torque-adjustable screwdriver, 1500-2500 rpm, with an 8 mm magnetic hex bit. If you also buy a depth-setting attachment - a few thousand forints - it physically prevents you from overdriving the screw. With this one accessory, 90% of screwing problems are prevented.
How to build a corrugated sheet roof
I don't want to pretend this is rocket science - that's precisely the greatest value of a corrugated sheet roof, that it isn't. You can move quickly with it, no special expertise needed. But there are a few things it's important not to get wrong, because that's where trouble comes from later.
1. The substructure - the foundation of the roof
Corrugated sheet needs a support structure underneath. On residential buildings this is typically 50x100 or 50x200 mm timber rafters; on industrial buildings, Z- or C-profile steel.
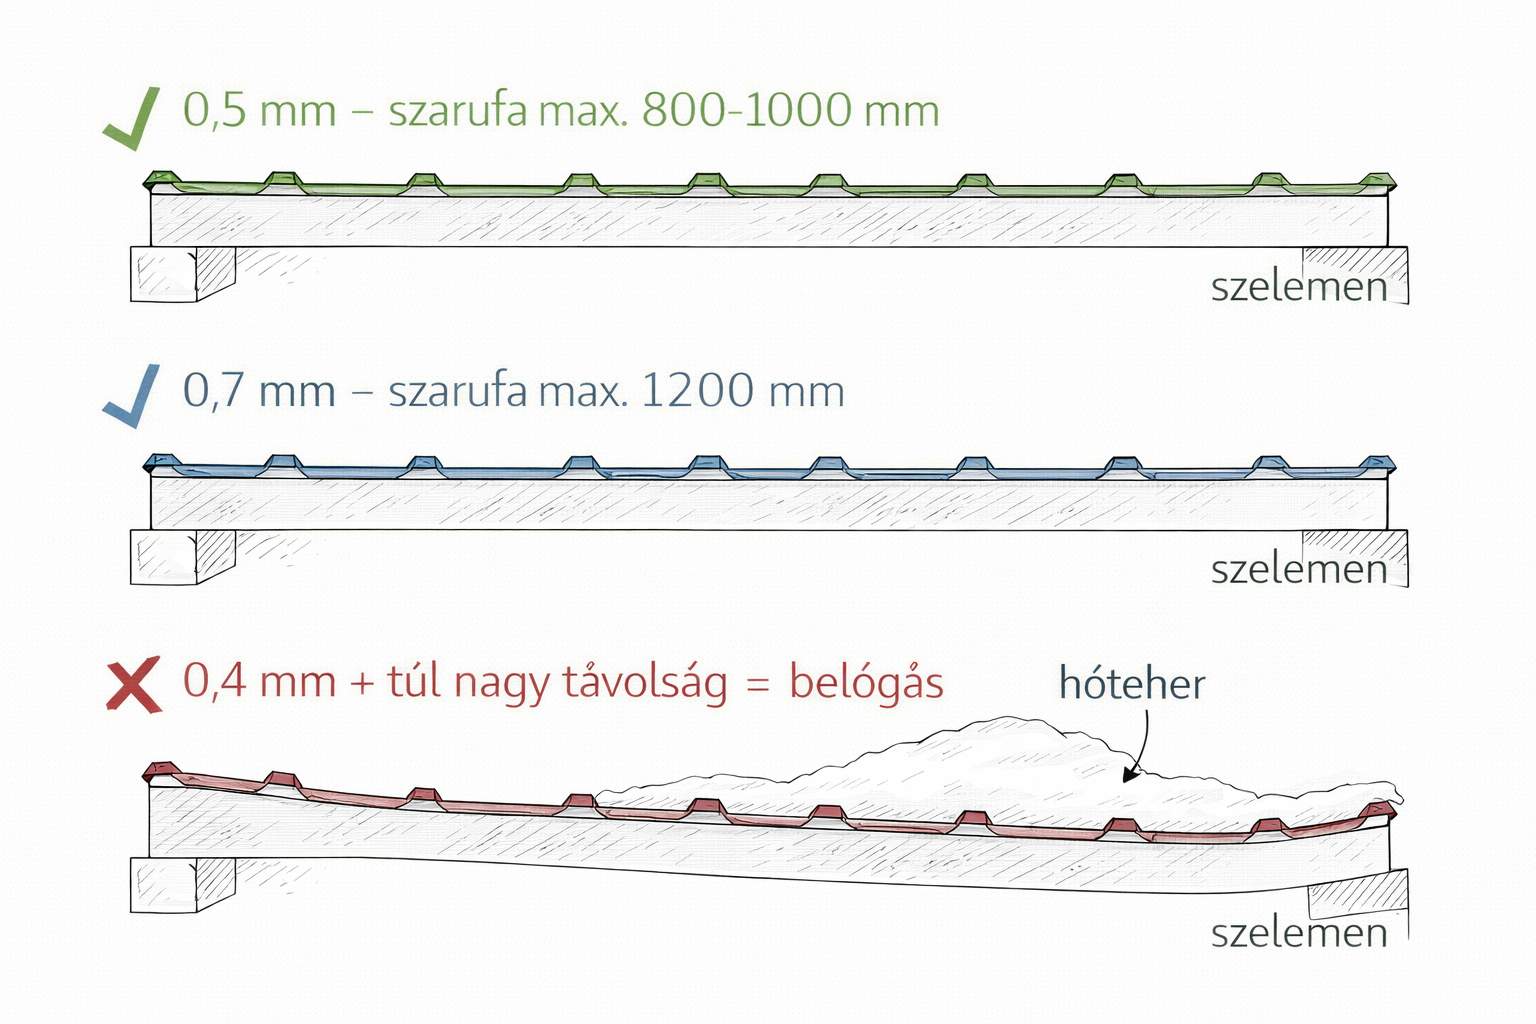
Purlin spacing is critical: for 0.5 mm sheet, 400-600 mm (40-60 cm) is ideal; for 0.6 mm, 500-700 mm (50-70 cm). If the purlins are too sparse, the sheet sags, and in snow and wind it can bend. The reverse is also true: if you don't want to buy a thicker, more expensive sheet, you can achieve the same result with closer purlin spacing.
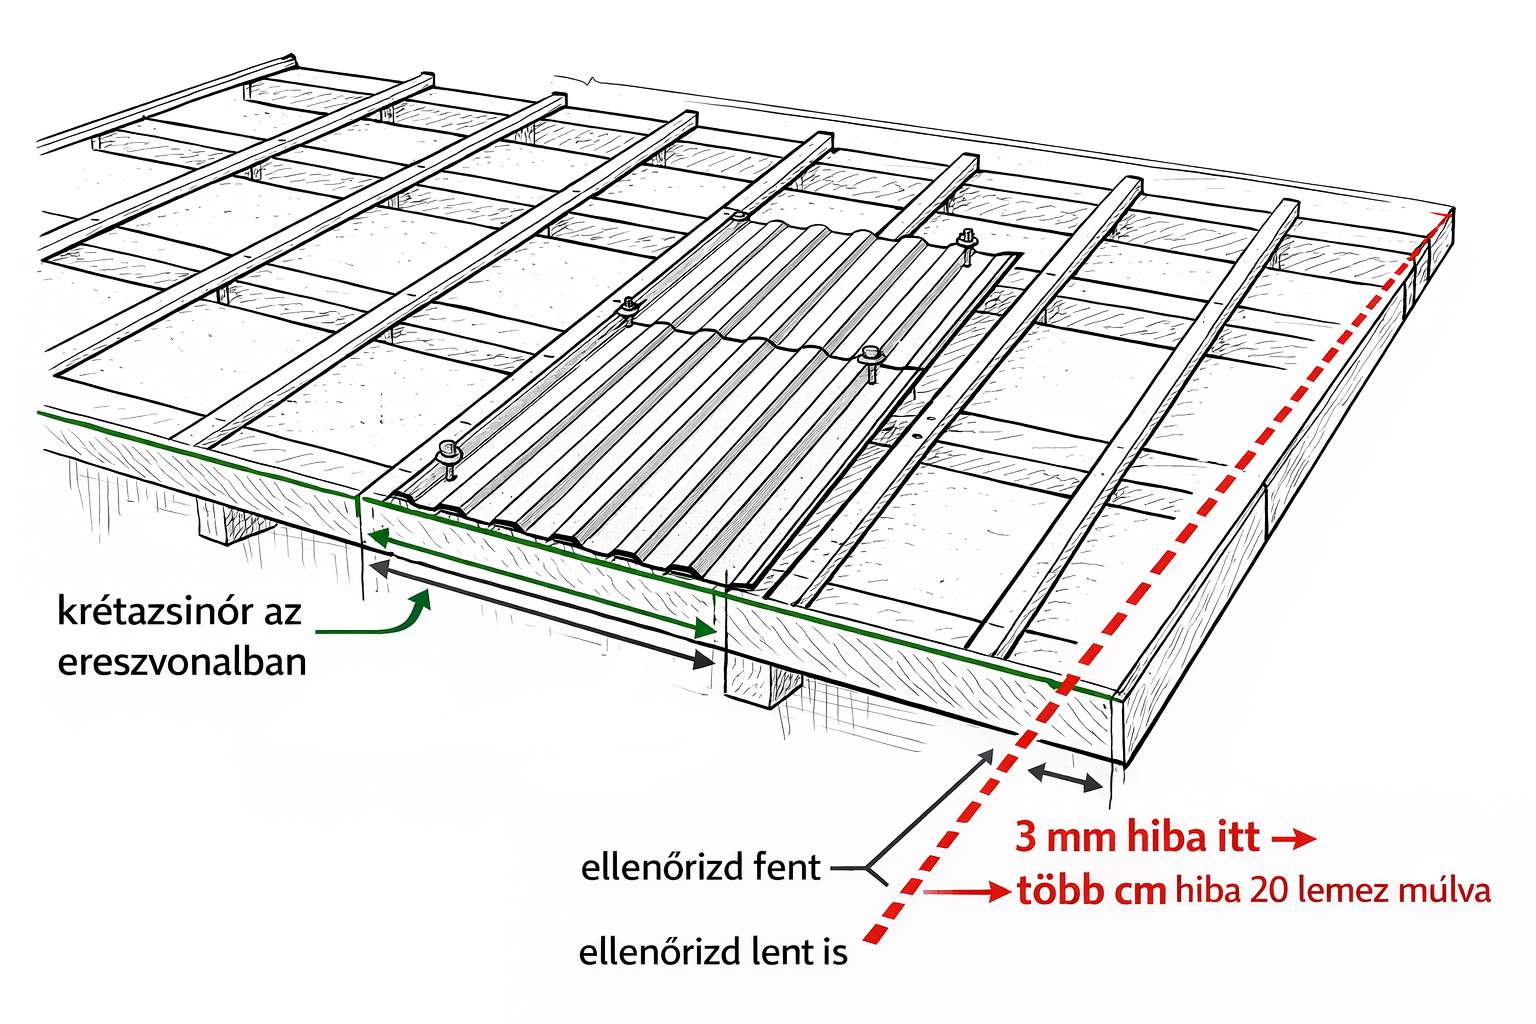
Before you put up a single sheet, check that the substructure is square. Use the 3-4-5 triangle method: measure 3 metres one way, 4 metres the other - the diagonal must be exactly 5 metres. Run strings along the purlin lines, and measure diagonals corner to corner. If they don't match, something is off, and it will show on every sheet.
We've got a dedicated article on support structures: Corrugated sheet purlin spacing guide.
2. Where to start? Wind direction matters.
Always start against the wind direction. If the prevailing wind in your area is from the west, start from the eastern gable - that way the side overlaps face away from the wind, and the wind pushes water away from the overlap rather than into it. Every major manufacturer - Kingspan, CSSBI, Metalworks - highlights this rule in their installation guide.
The first sheet decides everything. The position of the first sheet determines where all the others go. If you place it 2-3 millimetres off, 20 sheets later the deviation can be several centimetres, and it will show. Snap a chalk line along the eaves, check the dimensions top and bottom, and every 3-4 sheets look to see whether you're still running straight.
If the building isn't square - and most aren't - measure the diagonals and split the error between both gables. Don't let the whole deviation fall on one side.
3. Overlaps - the key to waterproofing
Our sheets are 116 cm wide, but only 110 cm of that is usable width - the remaining 6 cm is for the overlap.
Side overlap: One full rib, factory-formed - the profile is on top on one sheet and underneath on the other, so they nest exactly into each other. The two sheets mesh perfectly at the overlap.
Lengthwise (end) overlap: If the roof is longer than the sheet, an overlap is needed. At pitches above 10 degrees, minimum 150 mm; below 10 degrees, minimum 200 mm. The end overlap should always fall on a purlin, with three rows of butyl sealant tape in between.
The best end overlap? None at all. The end overlap is the weakest point of the roof - if you can, order the sheet in full eaves-to-ridge length, in one piece. Our production line can cut sheets up to eight metres long to size, so you can eliminate this problem junction completely.
4. Fixing - the most critical step
Two ground rules:
The screw goes in the trough, not on the rib. I know it seems logical to screw into the rib, but that's a mistake. In the trough the sheet rests on the purlin, the screw sits directly on the support, and the seal is much better. Screwing into the rib is standard on wall cladding, but not recommended on a roof - it's one of the most common reasons roofs leak.
Figure on an average of 10 screws per m². In the middle of the roof 6/m² is enough, at the edges 8, at the corners 10. At the eaves, ridge and outer rows, a screw goes in every trough. On intermediate purlins every second or third trough is enough, but densify in exposed spots.
Don't overtighten the screw. We often see someone attack it with a cordless impact and tighten as hard as they can. The rubber seal flattens, the sheet dents, the screw skews, and in a few years it starts leaking.
The right method: drive it until the rubber washer just protrudes beyond the edge of the metal washer - a small bulge shows, but no more. If the rubber splays or squeezes out, it's too tight. If you can still turn the screw by hand, it's too loose.
Pro tip: when you've finished a section, look up at it from below. Crooked screw rows show up immediately, and that's the signature of amateur work. Professional crews snap a chalk line along each purlin and check the line from the ground every 3-4 sheets.
5. Trims and junctions
The roof itself is usually not the problem - 90% of leaks are at junctions. Eaves, ridge, gable, chimney, vent pipe - this is where it all hinges.
Ridge: Profiled foam closure into the top of the sheets, then the ridge trim screwed on. Minimum 150 mm overlap between pieces, with butyl sealant.
Eaves: Drip edge, extending at least 25 mm under the fascia and 50 mm into the gutter. Foam closure at the bottom of the sheets.
Gable: Verge flashing with minimum 100 mm overlap, screwed working towards the eaves at 60 mm screw spacing.
Penetrations: EPDM rubber collars for small pipes (vent, antenna). Chimneys need stepped flashing and counter-flashing, with a saddle piece on the upper side to divert water.
You can read the detailed installation guides here.
Waterproofing and vapour control
A corrugated sheet roof is waterproof by itself - the metal sheet never lets water through. But for that you need it to be screwed down properly and the overlaps to be right, because that's where water can get in: at the overlaps and at the screws.
But water doesn't only come from above. Condensation attacks from the inside, and if it's not dealt with, sooner or later you'll be looking up at the ceiling and watching water drip back off it.
When do you need a membrane and when don't you?
Simple rule: if the building is heated - house, workshop, office - you need a vapour barrier. The warm inside air holds moisture, which condenses on the cold sheet, drips onto the timber structure, goes mouldy and rots. No thanks.
In an unheated building - garage, shed, open store - you usually don't need one, because the temperature is roughly the same inside and out, so there's no significant condensation.
When does condensation appear? When the humidity of the inside air reaches the dew point. At 21 degrees and 50% humidity, that's 10.3 °C. So if the inside surface of the sheet is colder than this, water appears on it. In winter, in heated buildings, this is practically guaranteed.
Anti-condensation felt - the smart solution
There's a solution that's much simpler than a membrane-and-ventilation combo: anti-condensation felt, for example DripStop. This is a fabric layer factory-bonded to the underside of the sheet, which absorbs moisture and then evaporates it back out as the temperature rises.
What can it do? It can absorb up to a litre of water per m². It's fire-resistant, also damps rain noise by roughly 10-20%, and tested to withstand more than 500 condensation cycles.
One important caveat: the felt needs ventilation to dry. In a closed, unventilated building it won't work - there you'll need a membrane instead.
Sealants - which one goes where?
Butyl sealant tape (6x4 mm): This is the staple. In overlaps, under trims, for every hidden seal. Stays sticky forever, practically unlimited lifespan. This is the most important sealant.
Neutral-cure silicone: For outside use where UV hits it: around pipe penetrations and trims. Important: never use vinegar-smelling (acetoxy) silicone, because it eats zinc and can ruin the material.
Foam closures: At the eaves and ridge, plugs that fit the corrugation profile. Closed (waterproof) and vented (open-cell) versions are available.
A key principle: sealant is always a secondary defence. No sealant can replace correct overlap and gravity. If a junction only stays dry thanks to silicone, it's a bad detail - it'll fail sooner or later. Fit it precisely, don't silicone it together.
Do you need thermal insulation?
If there's heated space under the roof, yes. For a shed, garage or store, not necessarily. But if yes, it's important to know there are two approaches, and the difference is significant.
Cold roof: Insulation goes between or under the rafters, above it a ventilated air gap, the sheet on top. Cheaper, but the rafters are thermal bridges, and if the membrane is damaged it can go damp and rot. This used to be the default.
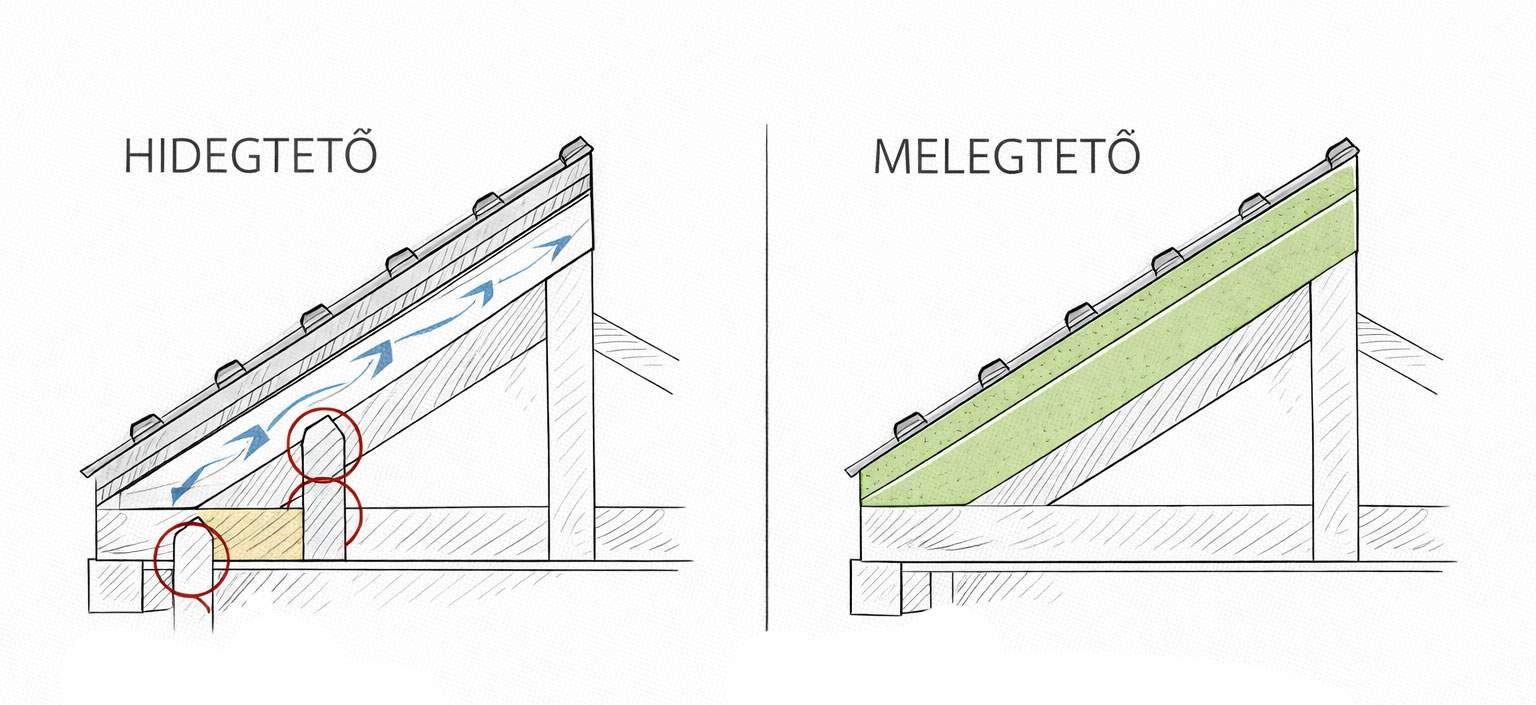
Warm roof: Insulation is laid continuously over the structure - no thermal bridge, no ventilation issue, much better performance. On new builds this is the correct solution. More expensive, but it pays back in the long run.
Insulation materials in brief:
PIR foam: The best thermal insulator - 120 mm of PIR is worth the same as 200 mm of mineral wool. Light, thin, excellent.
Mineral wool: Cheaper and A1 fire-rated, so it doesn't burn. But you need a thicker layer, and it's more sensitive to moisture.
Sandwich panel: PIR core between two steel sheets, factory-finished, quickly installed. More expensive, but the simplest solution.
What to expect: noise and heat
Is it really that loud in the rain?
Yes, you will hear it - but not the way many people imagine. Without insulation, a metal roof is noisy in the rain, that's true. But most buildings have thermal insulation, and even 10 cm of mineral wool or 5-6 cm of PIR foam noticeably dampens the noise. Anti-condensation felt alone reduces rain noise by 10-20%.
In an unheated outbuilding or garage this isn't an issue - there's usually no one under the roof when it rains.
Isn't it hot under it in summer?
Every metal roof heats up in summer, that's unavoidable. But the extent depends largely on colour and insulation.
A dark colour (anthracite, graphite grey) can reach 70-80 °C surface temperature in the sun. A light colour (white, light grey, beige) stays around 50-60 °C - that's 15-20 degrees less, which is a huge difference from an insulation perspective.
If there's heated space under the roof, thermal insulation is a must. Roof colour isn't just aesthetics, it's a technical decision too.
Colour and appearance
Many people picture corrugated sheet as grey and industrial only. The reality is that almost any shade can be had from the RAL palette, and in recent years matt-finish sheets have radically changed the look.
Popular roof colours: RAL 7016 (anthracite grey), RAL 7024 (graphite grey), RAL 8017 (chocolate brown), RAL 3009 (oxide red), RAL 6020 (dark green). The matt polyester coating gives a more elegant, understated effect - a gloss surface shows dents and waviness more.
One thing to watch: colour swatches on screen and in reality can differ slightly.
Graphite grey or anthracite corrugated sheet looks very good with a modern, white or grey façade. In rural settings, chocolate brown and oxide red are the most natural choices.
Solar panels on a corrugated sheet roof
A corrugated sheet roof is an excellent base for solar panels. The light structure (about 5 kg/m²) leaves plenty of reserve load capacity - a PV system adds 10-15 kg/m², which most roof structures handle without issue. Fixing is done with special brackets screwed to the sheet's rib - no need to drill holes into the body of the sheet.
What to watch: the sheet must be at least 0.5 mm thick. If solar is in the plan from the start, it's worth choosing 0.6 mm sheet and designing the purlin spacing tighter. A lighter roof colour doesn't hurt either: it warms the panels less, which gives better performance in summer.
Roof renovation with corrugated sheet
Not everyone builds a new roof - many people renovate. Corrugated sheet is excellent for this too, because it's light: it can go over or in place of the old covering without issue.
The most important thing to check at this point: the condition of the existing roof structure and the purlin spacing. If the timber structure is sound and the purlins are at a suitable spacing (maximum 80-100 cm for 0.5 mm T18), the sheet can simply go on top.
If you're stripping an Eternit (asbestos cement) covering, an asbestos removal procedure is mandatory - don't do it yourself, hire a specialist.
If the old roof is simple corrugated sheet or bituminous material, removal is usually straightforward. Afterwards it's worth inspecting the timber structure, replacing purlins as needed, and laying a membrane under the sheets.
10 things to definitely avoid
Based on many years of experience, we've gathered the most common mistakes we see on corrugated sheet roofs. Avoid just these ten and you'll already be among the best.
1. Don't use an angle grinder. The hot sparks burn into the coating, and within half a year the whole roof will be rusty. Warranty void. Use a nibbler.
2. Don't overtighten the screws. If the rubber seal squashes out from under the metal washer, the seal is gone. The sheet dents, water collects in it - and it leaks.
3. Don't fix without a chalk line. Crooked screw rows show from below and look like amateur work. Snap a line on every purlin.
4. Don't ignore thermal expansion. A 10-metre steel sheet moves 6 mm with a 50 °C temperature swing. Over 30 metres that's 18 mm - enough to tear out the screws. On runs longer than 20-24 metres, an expansion gap is needed.
5. Don't leave metal swarf on the roof. The tiny metal shavings from cutting rust within days and leave permanent rust spots. Sweep them off immediately, after every single cut!
6. Don't start from the wrong direction. If the overlaps face into the wind, the wind drives water in. Always start against the wind direction.
7. Don't order without a site survey. Buildings are never the exact dimensions on the plans. Always measure on site - otherwise you'll end up with too much or too little.
8. Don't store sheets without ventilation. On the ground, stacked, covered with plastic - in the morning there'll be white rust on them. Put them on boards, tilt them, allow ventilation.
9. Don't use vinegar-smelling silicone. Acetoxy silicone is acid-curing - it eats zinc and aluminium coatings. Only neutral-cure silicone is suitable on a metal roof.
10. Don't step on the rib crest. The top of the rib isn't supported - your body weight dents it and it never pops back out. Always step into the trough, directly over a purlin. In soft-soled shoes.
Other things that can ruin the roof - and how to avoid them
Even after correct installation there are dangers worth watching for. Rarer, but if they happen, they can cause serious damage.
Galvanic corrosion - when metals eat each other
When two different metals come into contact in a wet environment, it accelerates the corrosion of one of them.
Copper is forbidden anywhere near corrugated sheet. Runoff from copper pipes, copper lightning rods or copper gutters destroys the zinc, and once the zinc is gone, the roof will rust. If there is copper on the roof, pipe the runoff away from the sheet with PVC.
Treated timber - handle with care. Pressure-treated (impregnated) timber contains copper sulphate, so if you screw the sheet onto that kind of wood, put a moisture barrier between them.
Graphite pencil - surprising but true. Graphite corrodes aluminium and aluzinc coatings. The Metal Construction Association (MCA) has documented the problem with photographic evidence. It sounds trivial but matters - use a marker instead of a pencil for marking.
Stainless steel screws in a steel sheet - That's fine, the standard and correct solution.
Treating cut edges
Every cut edge means exposed metal that can start rusting straight away. Brush on the touch-up paint supplied by the manufacturer - degrease the surface first. If the damage is deeper, like a scratch or impact, apply a zinc-rich primer first, then the top coat.
How to walk on the roof
Always step into the trough, directly over the line of a purlin - that's where the support is. Stepping on top of the rib is forbidden, because it dents. Work in soft-soled, clean rubber shoes, distribute your weight evenly, and move slowly. Wet, frosty or dusty sheet is extremely slippery - be especially careful then.
Maintenance - about 15 minutes every six months
The great advantage of a corrugated sheet roof is that there's hardly anything to do with it. But hardly anything isn't nothing.
Go through the following each spring and autumn - 15-20 minutes in total:
Screws: Any loose, skewed or protruding screws? Are the EPDM washers cracking?
Trims: Are the ridge, eaves and gable trims in order? No movement?
Corrosion: Can you see rust spots, especially at cut edges and screw heads?
Gutter: Not blocked? Does the water drain away properly?
From the inside: Any water stains on the ceiling? Mould? Wet insulation? These all point to leaks.
Cleaning - once a year
Rinse off with low-pressure water - a garden hose is plenty. Two things are forbidden, though: never blast overlaps with a pressure washer, because the water drives in and starts leaking. And don't use a wire brush, scouring agents or harsh chemicals, because they can break down the sheet's protective layer.
Repainting - after 20-30 years
When the paint starts to fade and chalk, you don't need a new roof - repainting is enough. But it's important to start before serious trouble sets in, because once the sheet has corroded it's not a paint job but a replacement that's needed.
The process: remove rust spots, pressure wash, rust-inhibiting primer, then two coats of top paint. This dramatically extends the roof's life, and it costs a fraction of a full roof replacement.
If you have any questions, we're happy to help. We hope your roof will be a pleasure to look at for a long time - and if you're after good-quality sheet at a fair price, we humbly recommend ourselves!
Frequently asked questions
What thickness of corrugated sheet should I choose for roofing?
0.5 mm - this is the minimum we recommend for roofing. 0.4 mm can also work, but in our experience over many years, it generates more complaints. 0.6 mm is stronger and stiffer, but only worth it when purlins are further apart, or in industrial environments.
How much does it cost per m²?
Sheet prices range from 1 800 to 5 500 Ft/m², depending on type and coating. Accessories add another 15-25%. Labour is 3 000-6 000 Ft/m² at tinsmith rates.
What's the difference between galvanised and painted corrugated sheet?
Galvanised (natural) sheet has no paint layer - only zinc protects it. It's cheaper but ages faster and has no UV protection. Painted sheet has a paint layer over the zinc, which provides colour, UV protection and extra corrosion protection. For most roofs we recommend painted sheet.
Which profile should I pick: T8, T14 or T18?
For roofing, clearly T18. T8 and T14 have too low a rib height for roof cover - water can stand on them and the stiffness is insufficient. T14 is a good choice for wall cladding and fencing.
How much cheaper is corrugated sheet than tile?
On material alone, corrugated sheet costs a third to a half of concrete tile. In labour the difference is even bigger, because corrugated sheet is faster to install. Together, on a 100 m² roof, corrugated sheet can be 60-70% cheaper.
How long does a corrugated sheet roof last?
Depends on coating type and environment. Natural galvanised: 15-25 years. Polyester coating: 20-30 years. PVDF: 35-40+ years. We offer a 20-year warranty on our own sheets.
Is a corrugated sheet roof noisier in rain?
Without insulation, yes. On an insulated roof it's not disturbing - 10 cm mineral wool or 5-6 cm PIR foam noticeably dampens noise. Anti-condensation felt also helps.
Can you fit solar panels on a corrugated sheet roof?
Yes, and it's particularly suitable. The sheet must be at least 0.5 mm thick. Fixing goes onto the ribs with special brackets - no holes in the sheet body.
When is a corrugated sheet roof NOT worth it?
If appearance is the primary concern on a representative family house - in that case tile-effect sheet or standing-seam is better. If the pitch is very low and you have no experience with vapour control. If indoor noise sensitivity is critical and you don't want to insulate at all.
Do I need a membrane under the corrugated sheet?
On a heated building, yes - without vapour control, condensation ruins the timber structure. On an unheated outbuilding usually not, but it's worth choosing a sheet with anti-condensation felt.